You’ve got a lot of questions, and we’ve got the answers. What is dental floss? Dental floss is a thin strand of plastic or silk that you use to clean between your teeth. It’s a great way to remove plaque from your teeth, which can lead to cavities and gum disease.
But how do I use it? It’s actually super easy! Just wrap the floss around two fingers, then hold one end between your teeth. Gently slide the floss behind one tooth at a time until you’ve reached the other side, then pull the rest of the string through. Repeat this step for each tooth in your mouth!
Read on to learn more How To Use A Dental Floss Pick, How To Use A Dental Floss Stick AND How To Use A Dental Floss Holder

How To Use A Dental Floss Stick
Hopefully you already know that you should brush your teeth at least twice per day. But did you know that, in addition to brushing your teeth, you should also be flossing twice daily too? Lucky for you, WH talked to expert dentists about how to floss properly. And spoiler: You’re probably doing it wrong.
“Brushing your teeth only cleans three of the five exposed tooth surfaces,” explains Bill Dorfman, DDS, a cosmetic dentist based in Los Angeles. “A toothbrush cannot clean in between your teeth, so if you don’t floss, you are leaving dangerous bacteria in your mouth.” In addition to giving you bad breath (no one needs that!), this harmful bacteria can actually cause your teeth to decay. That’s why it’s best to floss a minimum of two times each day, but preferably after every meal, snack, or sugary drink, Dr. Dorfman explains.
Now that you know how often you should be flossing and why, it’s time to get a little more detailed. Read on for the step-by-step guide to how to floss your teeth, according to dental experts.
How do you floss correctly with a string?
Fumbling around with floss string, getting saliva on your hands, and the like, are all very not-fun parts of learning how to floss. That said, there are steps you can take to make your flossing process go as smooth as possible. Honestly, it’s all about finding a balance, explains Helen Mo, DMD, a dentist in the San Francisco Bay Area. “Too hard, and you could damage the gums; too gentle, and you may miss certain areas,” she says. Here are specific steps to follow that’ll help you find an effective floss stringing rhythm, according to Dr. Mo:
- Take a piece of floss about 18 to 20 inches long, and wrap each side around your middle fingers until you have about two inches of floss in the middle.
- Hold the floss tight between your thumbs and index fingers. Gently use your thumbs and index fingers to move the floss between the teeth.
- When flossing, make sure to curve the floss to wrap against each side of each tooth. Move the floss up and down, and side to side—ensuring that all surfaces (even slightly below the gums) are cleaned.
- As you move tooth to tooth, use a new, clean section of floss.
- Remember, avoid snapping the floss against your gums. You don’t want bleeding.
That said, learning how to floss the back teeth may be harder to reach than getting the hang of the front. “If using string floss for these areas is tricky for you, try the loop method,” says Dr. Mo. “Take a piece of floss, make a loop the size of your hand, and double knot to secure it. Place all your fingers except the thumb in the circle, then use your index fingers to guide the floss between the teeth. The looped circle helps the floss stay fixed instead of using a long piece of string.” Noted!
And if you’re wondering how to floss with a crown, know that you should be fine following the flossing routine described above. “If your crown is designed properly, you should have no problem flossing like a regular tooth,” says Omar Armstrong, DMD, a dentist at Armstrong Dental Studio in New York. Because crowns mimic the contours of natural teeth, you should be using the same techniques as you would the front and back of your mouth, Dr. Armstrong explains.
This content is imported from YouTube. You may be able to find the same content in another format, or you may be able to find more information, at their web site.
How do you floss correctly with a pick?
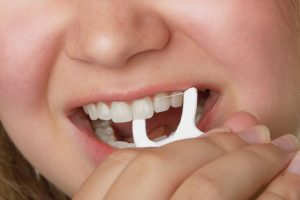
ICYMI, floss picks are D-shaped with a handle that contains a piece of floss stretched between the two arms, says Dr. Mo. Many people find them easier to hold, and they can be a more convenient way to floss, especially if you’re on-the-go. (They’re super easy to stash in a bag or wallet.) But are they the same as using flossing strings? Not exactly.
“Because the same, small segment of floss is being used over and over, there are some disadvantages to a floss pick,” Dr. Mo explains. “The floss may fray more easily, and the floss may also be less clean. It is difficult to curve floss picks at angles that can accommodate all surfaces and angles of the teeth.” TLDR; Regular floss is ideal, but floss picks are better than nothing if you’re in a pinch, Dr. Mo says, like doing touch-ups or quickly getting food out of your teeth before a big meeting.
Another item of note: “Some individuals have dexterity issues and may rely on floss picks to be able to adequately floss their teeth,” says Dr. Mo. “If this is the case, it is best to be mindful of the disadvantages and compensate appropriately to ensure a healthy mouth.”
How do you floss correctly with a water flosser?
If you’ve ever had braces, you’ve probably used a water flosser at least once in your life. (TBT to spraying the gobs of popcorn kernels out of your metal wires.) Water flossers use pressurized water to clean your teeth and dislodge food particles, but you can’t really floss your teeth with a water flosser, Dr. Dorfman explains. “It is better than nothing, but it can’t replace flossing with dental floss,” he says. However, they are a great tool for cleaning areas of your mouth that the toothbrush or floss can’t reach.
“They should not be used as a replacement for flossing,” Dr. Mo explains. “If your regular routine is working for you, then you probably don’t need a water flosser. But, if you’re looking for an additional tool to supplement your brushing and flossing routine for those hard to clean areas, you can try a water flosser.” Interested in nabbing a water flosser for yourself? Here are some steps to follow when using the machine, from Dr. Mo:
- When using a water flosser, make sure the tip is pointed parallel to your teeth.
- Aim the water at the gum line or toward your hard-to-reach area.
- Run the tip of the water flosser slowly across your teeth until you’ve removed the debris from your mouth to your liking.
Is it better to floss before or after brushing your teeth?
In short, you should definitely be flossing *before* you brush your teeth, says Leslie B. Wardell, DDS, a dentist with his practice based in Illinois. “The bacteria in your mouth grows quickly at night in the dark, warm atmosphere of your mouth,” Dr. Wardell explains. “You will more than double the amount of bacteria in your mouth when you sleep. For example, if you go to bed with two billion bacteria in your mouth, you will wake up with four billion bacteria.”
Basically, if you weren’t doing this already, you should be reaching for your string floss first thing in the morning. You’ve gotta get rid of that acidic bacteria, ASAP, and you have a better chance of doing so when first flossing away plaque and grime, then brushing for a spotless finish. Happy cleaning.
How To Use A Dental Floss Holder
Using a dental floss holder is a great way to ensure that you are flossing your teeth properly. It can be difficult to get the right amount of pressure when using a traditional string, but with a holder, this becomes easier.
The first step is to take the end of the floss and wind it around two fingers on one hand. Make sure that there is enough excess floss so that once you insert it into your mouth, there will still be plenty left over to pull out.
Then remove the floss from your fingers and place it between your teeth. The wire should be sitting between your upper and lower teeth with no gaps in between them. Now you can start moving the wire back and forth between each tooth using small, gentle motions.
The easiest way to use your floss holder is to place the floss in between your two fingers. Hold it at the tip and pull it out of the tube.
Once you have pulled out a length of floss, wind it around your middle finger, leaving about one inch from the end. Then, place the floss between your teeth and begin to move it up and down. You should always move in an up-and-down motion; never back and forth or side-to-side.
Be sure not to use too much pressure when you are flossing your teeth; this can damage your gum tissue or cause bleeding at the gumline. The key is to use light pressure as you glide along each tooth.
There are many different types of dental floss holders available, including the one-handed, two-handed and electric varieties. The two-handed variety is the most popular because it’s easy to use and can be used by people who have limited dexterity or arthritis in their hands.
The floss holder is made up of two pieces: a handle and a plastic or metal tube that has a slot cut out of it so that you can insert floss through it. This can be done with your favorite brand of floss or even unwaxed dental tape if you prefer a wider surface area.
Once you’ve inserted your floss into the tube, you’ll need to hold onto both ends of the handle tightly so that you don’t drop your floss during use. Then simply slide your fingers around each end until they meet in the middle.
This will create a loop in which you can wrap around one tooth at a time until all surfaces have been cleaned thoroughly!
Dental floss holders are a great way to use dental floss. They make it easier to use dental floss and are more comfortable for people with arthritis or other disabilities that make it difficult to use traditional dental floss.
How To Use A Dental Floss Pick
Dental floss picks are D-shaped pieces of plastic with a handle. They contain a single piece of floss stretched between the two arms and can be a convenient way to floss, especially if you’re on the go or have mobility issues with arthritis in your hands
But how can you make sure you use dental floss picks properly? And are they effective? Below, the dental experts at Northside Dental Clinic will answer these questions for you.
How do I floss with dental floss picks?
Dental floss picks aren’t the same as normal floss strings because they use the same small piece of floss throughout your entire mouth. It can also be difficult to curve the floss picks to get into all the different angles and surfaces of your teeth. However, if you use the right technique, flossing with dental floss picks can be an effective way to fight plaque and bacteria buildup between your teeth, on the surface of your teeth, and underneath your gums.
To start, here are three easy steps to follow while flossing with dental floss pics:
- Use the pick to get between two of your teeth and gently press it against your gums.
- Slide the pick with an in and out motion to remove any food particles from between your teeth.
- Rinse the floss pick as needed to make sure it stays clean.
Repeat the above process until you have thoroughly cleaned any plaque and food particles out from between all of your teeth.
Are dental floss picks effective?
Yes, dental floss picks are an effective way to floss, especially if you’re on the go, such as between work meetings or camping without access to a bathroom and sink. However, they are more difficult to use than traditional floss and you may not be able to reach all areas inside your mouth. Additionally, a floss pick may be less clean and is more likely to fray since you’re using the same small piece of floss the entire time.