How To Use Teeth Whitening Gel>Teeth whitening gel may be your best bet if you want to quickly improve the appearance of your smile. It takes only a few minutes to set up, and you can start seeing benefits in as little as 24 hours! To whiten your teeth, it first removes surface stains to reveal their true color. After applying the gel to the toothbrush, it is rubbed against the teeth. After a few seconds, the gel will dry, leaving a thin film of the active component that can be used to clean your teeth. After you’re done brushing, just gargle some water to get rid of any leftover toothpaste.
Teeth whitening gel is an easy way to improve the look of your smile without having to schedule an appointment with a dentist or make other changes in your daily routine. It’s also less expensive than professional treatments or kits purchased from drugstores because it contains fewer ingredients than other options on the market today!
Teeth whitening gel is a great way to lighten the teeth. These products are effective, inexpensive and very easy to use! In this article we take a look at the best teeth whitening gel out there and give you helpful tips about how to use it for beautiful pearly whites. Read on to learn more on forgot to put teeth whitening gel in fridge and best teeth whitening gel.

How To Use Teeth Whitening Gel
These are general recommendations and may vary between manufacturers. Please read the manufacturers instructions and use this as a friendly guide in addition to the manufacturers instructions.
DENTAL WORK:
Tooth Whitening (bleaching) gel will only whiten natural teeth. It will NOT bleach (whiten) nor harm bonding, caps, crowns, bridges, fillings, or any other artificial dental work. You may have to have the dentistry redone to match your new white teeth. Tetracycline (an antibiotic) stained teeth or grayish teeth are more difficult to bleach and have a varied prognosis. The exposed root portion of teeth, which occurs with gum recession will also not bleach. If you have amalgam (silver) fillings in, near or behind the front teeth, long term bleaching can cause the surrounding tooth to have a greenish tinge. Bleaching teeth that are see-through can cause the teeth to become even more translucent and may give the tooth a darker appearance. It is essential to consult a dentist if you have any of the above concerns.
SENSITIVITY:
Your teeth or gums will most likely become sensitive. It’s common while using all products containing peroxide-based gels, and it is not harmful. In case of increased sensitivity, reduce usage time or frequency until the sensitivity subsides. Due to the high prevalence of sensitivity, dentist.net recommends the routine use of Dr. Collins BioMin Restore Toothpaste before and after using bleaching products.
WARNINGS:
Keep bleaching gel out of reach of children. Do NOT use if pregnant or during nursing. Do NOT smoke, drink or eat while bleaching your teeth.
PRODUCT SHELF-LIFE:
DENTAL WHITENING GEL SHOULD BE REFRIGERATED FOR LONG TERM STORAGE. Shelf life is typically one year un-refrigerated and two years refrigerated (Nite White and Day White have a 2 year un-refrigerated shelf life.)
Please read the manufacturers instructions and use this as a friendly guide in addition to the manufacturers instructions.
For more answers to common whitening questions, click here. Please visit our sensitive teeth section for more about tooth sensitivity.
PRE-BLEACHING INSTRUCTIONS TO MINIMIZE SENSITIVITY
- Two weeks before bleaching, brush your teeth regularly with a desensitizing toothpaste like Dr. Collins BioMin Restore Toothpaste.
- After brushing for a few days, wear your EMPTY bleaching trays alone for a few hours or even overnight.
- After wearing the empty trays, fill them with Relief ACP Desensitizing Gel for 1 hour before bleaching. Alternatively, dentists also recommend placing desensitizing toothpaste like BioMin Restore in the tray.
- After getting used to having the trays in your mouth, remove any desensitizing toothpaste or gel before putting the bleaching material in the tray. DO NOT MIX bleaching material and desensitizing material. Please refer to the bleaching instructions:
USAGE INSTRUCTIONS FOR PROFESSIONAL-GRADE DENTAL WHITENING GEL
It’s important that you apply the teeth whitening gel properly in order not to waste any of the gel and so that you experience the least amount of sensitivity while using the gel.
1. IMMEDIATELY BEFORE TREATMENT:
Brush and floss right before bleaching your teeth. Whitening products are most effective with clean teeth. Try the trays in first without any beach to check the fit and comfort. Make sure that the bleaching trays are clean and dry before applying the whitening gel. Moisture reduces the efficiency of the whitening gel and slows down the whitening process.
2. APPLYING THE BLEACHING GEL:
When you apply the gel, make sure not to fill the trays. Place a SMALL drop of tooth whitening gel halfway inside on the front surface of the tray. DO NOT spread the bleach around. It should just be in front of each tooth in the tray. Recap the syringe for the next treatment until empty.
The average treatment per arch requires approximately 0.5ml of whitening gel. We recommend that you only bleach the front 6-8 teeth since no one sees the back teeth.
3. INSERTING THE BLEACHING TRAYS:
Insert the whitening tray in your mouth over your teeth. Seat the tray firmly against your teeth. Wipe any excess gel that seeps onto your gums with your finger or with a tissue. Wear the tray with the gel as directed below.
4. WEARING TIME:
We recommend that if you haven’t used whitening products before, use for 30 minutes to 1 hour the first time. You may increase the wearing time if there is little or no tooth sensitivity.
General manufacturers recommended wearing times are:
For Carbamide Peroxide Bleaching Gels:
- 10%, 15% or 16% strength can be used 2 to 4 hours once or twice/day. You can keep it in overnight while sleeping if you don’t experience major sensitivity after initial applications.
- 20-22% bleaching gel: use for 30 minutes to 1 hour once or twice per day. DO NOT exceed 1 hr/application.
For Hydrogen Peroxide Bleaching Gels:
- Day White and Dentist.net Hydrogen Peroxide Bleaching gel can ONLY be used for 30 mins to 1 hour.
5. AFTER WHITENING:
Remove the tray and rinse off your teeth. Brush any remaining gel away. Brush, floss, and continue routine dental cleaning. Apply desensitizing gel and use BioMin Restore if your teeth become too sensitive. Repeat steps 1 through 4 again using the desensitizing gel.
6. CARING FOR YOUR TRAYS AND GEL:
Clean the whitening trays with a toothbrush or Q-tip and cold water. Store trays in the tray holder and gel in a cool and dry place away from heat and direct sunlight. The gel may be refrigerated to prolong the shelf life, but do not freeze.
DENTAL WHITENING GEL SHOULD BE REFRIGERATED FOR LONG TERM STORAGE. Shelf life is typically one year un-refrigerated and two years refrigerated (Nite White and Day White have a 2 year un-refrigerated shelf life.)
Please read the manufacturers instructions and use this as a friendly guide in addition to the manufacturers instructions.
ADDITIONAL NOTES:
- On average, desired level of whitening results are achieved after 20-30 cumulative sessions of wear-time.
- Continue brushing your teeth with Dr. Collins BioMin Restore Toothpaste in between bleaching.
- Longer wear times create faster whitening results but can also result in more sensitivity without the proper precautions being followed.
- Faster results can be achieved with higher concentrations of Carbamide Peroxide or Hydrogen Peroxide but can also result in more sensitivity without the proper precautions being followed.
- 50% of the bleaching takes place in the first 1-2 hours.
- We highly recommend you bleach the top teeth first (one tray at a time) and use a low strength percentage of bleaching gel. Use 10% carbamide peroxide (CP) to start.
- Repeat the cycle daily. If you don’t experience any significant issues with sensitivity, you may replace 10% CP with a higher concentration to possibly shorten the bleaching time.
- If you have sensitivity after bleaching, do some of the following:
- Skip a night/day or two of bleaching, and start again.
- Start with 30 minutes and increase the wearing time if you experience no sensitivity.
- Most effective is to place Relief ACP Desensitizing Gel or Dr. Collins BioMin Restore Toothpaste inside the tray after bleaching. Do NOT mix desensitizing material with bleaching gel.
- Use alternate applications of the tray. Use desensitizing material before and after using bleaching products.
Forgot To Put Teeth Whitening Gel In Fridge
Undoubtedly, tooth discoloration is one of the most common tooth defects in Nigeria. People get their teeth stained as a result of drugs, water, or sometimes hereditary. In the past, people used substances like charcoal, ash, and glass to achieve their smile dreams. As of today, technology has improved from those to teeth whitening kits, laser whitening procedures, teeth whitening paste, and the likes of them.
Teeth whitening kits have become a platter. Every toothpaste brand has succeeded in producing a remedial solution to helping people achieve a bright smile. Because of its convenience, a lot of people jump on it without being aware that teeth whitening kits is no guarantee to achieving a perfect smile.
Further research on the ingredients available on every teeth whitening kit has revealed that the content of hydrogen peroxide lies within the range of 10% – 15% which is minimal to helping to achieve a perfect smile. On the other hand, dentists have and are offering long whitening procedures using hydrogen peroxide concentration which is up to 40%, thus making the effectiveness of a walk-in teeth whitening procedure more effective than the former.
Teeth Whitening Kits: What are They?
These kits come in different forms, however, they are mainly a collection of trays and tubes of whitening gel/syringes used to bleach the teeth. For usage, the trays are often filled with the substance and placed on the teeth for a while before rinsing. Here is a list of the various types of teeth whitening kits.
- Teeth Whitening Kits with moldable trays
This type of whitening kit needs to undergo heat before usage. You have to heat them up before placing them on your teeth, achieve your teeth mold, then place in the whitening gel to achieve results.
2. Whitening kits with prefilled trays
Just like the name, these trays were already filled with whitening gel. All you need do is to place them on your teeth. This is the most common as they come in really handy and convenient to use.
3. Whitening kits with LED lights
As of now, LED whitening kits are becoming popular. This is because this looks finer and is said to be more effective when compared to others. The kit is attached to led light to help with even distribution of gel substance on the teeth. Most whitening kits come with manuals and teeth shades. When you purchase one, ensure that you go through it in order to track your progress.
How Do Teeth Whitening Kits Work?
The process of teeth whitening is similar to any bleaching process. The application of the teeth whitening substance and the amount of time used facilitates the teeth whitening process. The gel substance contains carbamide peroxide and hydrogen peroxide as the main ingredients. Fast-acting gels contain higher hydrogen peroxide concentration making them more effective in removing stains and deep coloration. With prefilled and doable trays, the contact between the substance and your teeth is what propels the whitening action. On the other hand, LED light enhances the effect of hydrogen peroxide on the teeth.
How To Use Teeth Whitening Kits: Process and Frequency.
Teeth whitening kits are designed to be used for two weeks and most of them take about an hour before you begin to see effects. Despite this, the number of days required for usage varies on the type of teeth whitening kits you are using. Even for the best of results, the following instruction would help you attain a bright smile.
TO WHITEN TEETH USING KITS WITH PRE-FILLED TRAYS, YOU MUST FOLLOW THE FOLLOWING STEPS:
- Brush your teeth.
- Remove two trays from the packaging.
- Line the top tray against the bottom of the top teeth and carefully push the tray upwards onto the teeth.
- Repeat this step for the bottom tray.
- Close your mouth, but be careful not to bite down hard to avoid oozing the gel.
- Keep the trays in position for the specified period as in the instructions. Afterward, remove and dispose of the trays.
- Use water to rinse the teeth and gums of any excess gel.

best teeth whitening gel
There are plenty of teeth whitening kit brands available in the market today. And just like with any other teeth whiteners, results may vary from one user to the other. Generally, the effectiveness of these kits depends on the hydrogen peroxide concentrations and how well users follow the instructions given.
While choosing the best whitening kit may be difficult, a good rule of thumb is using whitening kits recommended by a dentist. Going through credible and trustworthy teeth whitening kit reviews may also help simplify your searching process.
In conclusion, achieving a pearly white smile is everyone’s dream. Teeth whitening has proven to offer an easy and convenient way to keep the teeth perfect but may not always match the results as with in-office teeth whitening procedures. Though, there are daily improvements on whitening kits to help attain a better result. That begs the question: Do teeth whitening kits really work?
A Word of Caution
Some teeth whitening kits do work to certain limitations. They can be effective at eliminating some stains and teeth discoloration, but their effectiveness may vary among users. Be careful what you buy in the market. Some of the kits can have significant damage to your teeth because of the chemicals in them and the process they use. We would always advise you to speak to a professional before purchasing them or applying them. The damage they can cost if not conducted properly could be very costly. For proper teeth whitening, ask your dentist for in-house teeth whitening which would be conducted by a professional in a safe environment.
How to use teeth whitening gel without tray
They say your teeth are the second part of your face that people look at after your eyes, and in today’s world where everyone from influencers to A-listers have megawatt smiles, it’s easy to see why teeth whitening is on the rise. Who doesn’t want a set of dazzling pearly whites? There are so many options out there but the most important decision you have to make while researching is, where to have it done and what kind of treatment is best for you. I chose to have it done at Smilepod as they came highly recommended and after my initial consultation, I was given the at-home Philips Zoom! DayWhite kit, which is best in the long term. Read on for everything you need to know…

The at-home kit comes with three whitening syringes
How does teeth whitening work?
Firstly, you’ll visit the dentist to have impressions of your teeth done to make into mouth guards. I only had to wait for one week before my mouth guards were ready and I was back in the dentist chair, being shown how to use my at-home kit. I must admit, I had initially hoped to have an in-chair treatment at the dentist, just so that I could have the treatment over and done with in one visit, but I was surprised at how simple and easy to use the at-home kit is.
You simply squirt a tiny amount of bleaching gel onto your mouth guards and put them on; my dentist recommended just doing the central six top and bottom teeth as they’re the most visible and it means your gel supply doesn’t run out as quickly, but you can apply gel to every single tooth. The mouth guards were perfectly comfortable to wear and really straightforward to use.
Once at home, it depends on your kit and your needs, but I was told to wear my mouth guards for two hours per day for two weeks, and advised not to eat for one hour after each session. You can’t eat or drink while you have your mouth guards in as this can affect the bleaching gel, so it requires a bit of time management. I found doing the treatment in the evenings after dinner and just before bedtime the least disruptive to my routine, but if you’re a bit of a social butterfly and out and about most evenings, then an overnight kit might be best.
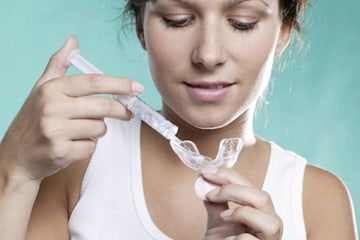
Squirt the teeth whitening gel into your moulds
What results can I expect?
I was genuinely amazed by how quickly the treatment worked. I had minor staining on my teeth and after the first session, the stains had already lightened if not completely disappeared. I was floored! I noticed my front teeth in particular looked brighter and whiter and I immediately felt more confident and content about my gnashers. I was also amazed by how little gel you need to apply to each tooth for it to work. The at-home kit was so effective, I’m a total convert now!
Smilepod offers teeth whitening treatments
DON’T squirt too much gel onto your mouth guard. You only need a small amount to make it effective and you don’t want to have too much bleach on your gum line as this can damage the gums.
DON’T eat or drink while wearing the mouth guards. I thought I’d be able to drink water at least during the two-hour sessions, but this is not advised as the water can get into your brace and dilute the bleach, making it less effective. It sounds like a long time but I quickly got used to not reaching for the water.
DON’T eat food for an hour after taking your mouth guard out, especially acidic food if you have sensitive teeth. It goes without saying, tea, coffee and red wine stain teeth faster.
DON’T go overboard. It’s recommended to have your teeth professionally whitened once a year maximum. I was advised that the at-home kit was best for me in the long term than an in-chair treatment. Teeth whitening can last for a few months or even a couple of years depending on what you eat and whether you’re a smoker.