How To Use Dental Floss To Straighten Teeth
If you’ve been told your teeth look crooked, it’s likely due to crowding. If your mouth is too small for your teeth, they may protrude more than usual. But, this isn’t always cause for alarm; occasionally it simply indicates that one or two teeth are more prominent than the others.
This problem can be solved with dental floss. With dental floss, a fine thread, you can gently and effectively realign your teeth. It’s a simple solution to the problem of improper bite alignment that can save you a trip to the dentist’s office.
Your teeth might not be perfectly straight, but that doesn’t mean you can’t use them to help you straighten other things. If you are one of those people who hang their keys or zippers on their teeth, then you’ve been doing it wrong your whole life. Read on to learn more on how to floss back teeth and how to floss teeth without floss.

How To Use Dental Floss To Straighten Teeth
The increasing popularity of do-it-yourself (DIY) videos courtesy of YouTube, has spurred a wave of people eager to learn what they can save money on by doing it themselves. Many are even questioning why they should spend money on expensive braces when they can do it at home — and practically for free — with just dental floss or elastic bands.
How to make DIY braces
You’ve probably heard of lingual braces, ceramic braces and metal braces. But have you heard about floss or elastic band braces? They say where there’s a will, there’s a way. And that includes at-home orthodontics. It’s a startling yet growing trend among those who want straight teeth without going to the dentist.
A majority of those opting for homemade or DIY braces either don’t have dental insurance or simply can’t afford their projected out-of-pocket expenses. Instead, for less than $5, they’re buying dental floss or elastic hair rubber bands and tying them around their teeth. Over the course of a few weeks to a few months, the pull of the “gap bands” straighten the crooked teeth and close any gaps.
Ironically, a quick Internet search of “gap bands” brings up Goody Ouchless Mini Elastics, a rubber band intended to not pull your hair during wear, is now being used to pull teeth closer together. If you did a quick search yourself, you may be thinking, “Those bands look just like what dentist use.” Well, yes and no. The use of elastic bands in orthodontics has been around for decades. But, there’s a science to moving teeth that comes from years of study. If it were as easy as YouTube vloggers make it seem, we wouldn’t need dentists.
While having a Macgyver-esque mentality is certainly handy in a variety of situations, DIY braces isn’t one of them. On the surface, it’s easy to be drawn in by the promise of a perfect smile without going to the dentist. But what’s going on beneath the surface?
Are free braces worth it?
Let’s think about it this way. If you had a broken hand or nose that needed to be reset, you would (hopefully) go to the doctor to ensure that it was properly realigned so that it would heal correctly. Your teeth are no different. To put it in more black and white terms, the potential risks of DIY braces far outweigh the reward of potentially saving a buck.
Here are just some of the dangers of DIY braces:
- Gum and tooth pain
- Unbalanced bite
- Relapse of teeth into their original, undesired position
- Gum inflammation
- Gum infection
- Discolored teeth from loss of blood flow
- Root damage
- Loose teeth
- Loss of teeth
- Bone loss
How to save at the dentist
An ounce of prevention is worth a pound of cure. If you want to save money at the dentist, you can do so by practicing good dental hygiene and by making good decisions about your dental health. This includes not playing orthodontist on your chompers.
When Dr. Steven Astuto, an orthodontist from Texas, was asked about the dangers of DIY braces, he didn’t hold back. “So what you started out hoping would be a really quick fix to close that little space is now costing you thousands and thousands of dollars in surgical fees and now you have to have two implants to replace those front teeth, and it’s just not a good situation.”
With that being said, we can now also add “excess dental fees” to the risk list started earlier.
Affordable braces without dental insurance
Even with dental insurance, the cost of braces is expensive. Considering that most individual dental insurance plans have a maximum annual benefit of $1,000 to $1,500 and that braces can cost anywhere from $3,000 to $10,000, many people feel they’re in a lose-lose situation.
Fortunately, there’s an alternative dental insurance known as a Cigna dental savings plan or Cigna dental discount plans. If you need braces but can’t afford traditional dental insurance, a dental savings plan may be a better fit for you. Think of it like Triple A of the dental world. You pay a low annual membership fee directly to the dentist, and receive discounts upward of 60% on a variety of dental services in return. Since the dental insurance provider is cut out of the equation, the dentist is able to pass the savings on to you.
Here’s a quick look at some additional benefits Cigna dental savings plans offer that dental insurance doesn’t:
- Discounts between 10% to 60% on most dental procedures
- No maximum annual benefit
- Eligible for discounted work even if you have a preexisting condition
- No waiting period to take advantage of discounts
Plus, most dentists will accept both dental insurance and dental savings plans. If you’re not sure if your dentist will, all you have to do is ask.
How To Floss Back Teeth
First, off – relax. It is normal for a small piece of fibre or dental floss to get stuck between the teeth once in a while. To avoid this situation, beware of risk factors. Maybe you are doing it too fast or maybe you just have a dodgy piece of floss. Be cognizant that flossing is an intricate process.
Nonetheless, If this happens, simply let go of one of the ends of the floss. You can then pull the floss through your teeth. If the stuck piece of floss does not move so freely, try shimmying it from side to side in a gentle motion to dislodge it from between them.
One thing to avoid if floss gets stuck between your teeth is any kind of yanking or pulling. This can pull on the tooth and cause pain, irritate the gums and the fine strands of nylon in the floss might even cut or scratch the gum line, which can cause them to bleed.
How to Floss with Braces
As professional dentists, we understand the benefit of fitting braces. However, one of the main drawbacks, when you have wire arches pulling your teeth into position, is that you will find they can easily get in the way while brushing or flossing. But as professionals, we must say you should not try to avoid the issue.
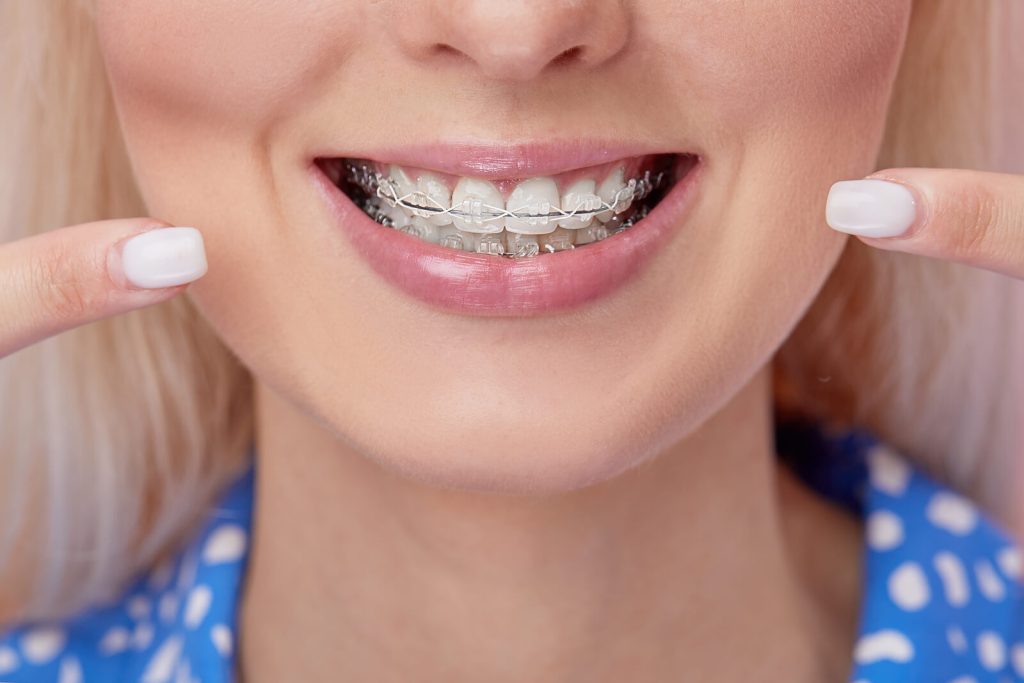
Care for your teeth when wearing braces is vital. We understand the frustrations of patients and offer services for nervous people. To help make it easier, keep the following pointers in mind:
- Use wax floss: The metal, ceramic, or acrylic braces in your mouth make it more likely for the more fibrous unwaxed floss to become caught, snag or tear. Waxed floss is a little bit thicker and will offer an exceptionally smooth thread, which does not snag.
- Try a floss stick: Floss sticks are like a toothpick, but with a semi-circular hook that has a taut piece of floss attached to it. These can be a godsend when travelling, but they are also excellent options for people flossing with braces.
- Use an air or water flosser: You can easily get between the teeth and right to the gum line without having to use any thread with an air or water flosser. Water flossers are very comfortable if you have braces, and you can use them to blast the braces too.
Frustratingly, flossing when you have braces is proven to be more important than when you do not. Small bacteria can gather in all the little nooks and crannies of your braces and grow, which might cause further problems down the line!
How Often to Floss
There is no set rule on how many times to floss daily.
Ideally, you should floss as much as you should brush – and this is after every meal. To illustrate how important flossing can be, think about when you have had particularly crunchy food. You might find that your teeth feel kind of ‘stuck’ afterwards. This is a clear sign that there is debris between your teeth and a prime opportunity to brush or floss.
Once in the morning and once and night is a good habit, but generally the more you can floss the better. However, you should be careful not to over-floss and you must leave flossing aside if your gums become irritated or bleed – this will give them time to heal.
Alongside flossing and dental checkups, it is recommended that you see a hygienist for a professional teeth cleaning from time to time. A hygienist will floss your teeth as part of the treatment and do some other cleaning techniques, such as polishing, as well.
How to Stop Gum Pain After Flossing
If using floss and dental tape is a new habit for you, or you have fallen out of your routine, you might experience sore and bleeding gums after a floss. The following are some tips to help avoid gum pain after flossing:
- Use smooth, gentle movements: Intense flossing might mean the floss presses against, scrapes or otherwise touches the very sensitive gums. To keep your gum tissue calm use a long, smooth movement, almost like using a saw or slicing bread.
- Brush gums regularly: Gums that are not stimulated and cleaned through brushing are much more likely to be sensitive, become irritated or feel awkward during a floss. When you brush, be sure to pay close attention to the gums, for a cleaner mouth.
- Try an air or water flosser: There are special flossers that use compressed air or small jets of water that shoot between the teeth. As there is no floss involved, these can be quite useful. If you are just starting flossing with an air or water flosser is a good first step.
Flossing is not super comfortable for most people. But, like most habits, you get used to it. Try to push through the initial discomfort, before you know it you will have cleaner teeth and not even remember how weird it was in the beginning.
How to Use Floss Picks
Floss picks, or floss sticks, the toothpick-like device that has a tethered strip of floss attached, can make flossing easier and more convenient. However, you should be aware of the following recommendations that will make them more effective:
- Throw them away after use: If you want to get a really good floss, equivalent to the feeling of regular floss, then you will probably need multiple floss picks for each session. One for the bottom and one for the top teeth is a good general rule.
- Slide gently: When doing the usual flossing seesaw motion, try to be extra careful. There is not much room for manoeuvre with a floss pick, so you can easily bump the sides of the gum and tooth with the plastic if you do it too rough.
- Rinse: A simple run under the tap will remove the remaining debris from the floss, which is much shorter and will more easily accumulate on a floss stick. So, do this regularly. It is worth rinsing a floss stick after every tooth!
Most dentists agree that floss picks are not quite as effective as regular floss, because it is more difficult to reach the back teeth with a small strip of floss and the quality of the floss deteriorates rapidly after flossing just a few teeth. However, they are worth having if you have no other option.
How to Floss Under a Bridge
A dental bridge, which is used to restore the appearance of missing teeth, will require special cleaning. Much like the use of braces, a dental bridge can become a potential breeding ground for bacteria. This might cause bad breath, gum disease and even further tooth loss!
An air or water flosser can be very useful when flossing under a bridge, but if you want to use regular floss this is also possible. It is quite difficult to clean under a bridge with a floss stick, so it may be best to stick to regular floss.
How to Floss with Veneers
The key to flossing with veneers is being extra gentle in your movements and not irritating the gums. If you have veneers, you might not feel the same sensitivity as you do on a natural tooth, so it is easier to irritate the area. Try to keep this in mind, but flossing will not damage a veneer.
Pores get a bad rap, but these microscopic openings in your skin are actually vital for producing oils that moisturize and maintain a healthy complexion. When pores get clogged and form blackheads, however, all you want to do is get rid of them. Preventing blackheads entails much more than lathering up a cleanser and splashing some warm water on your face. Ahead, celebrity esthetician Kate Somerville, founder of Kate Somerville Skincare and Skin Health Experts Clinic, breaks down how to remove blackheads properly—and keep them away for good.
First, how do blackheads form?
Before you attempt to break out the magnifying mirror and remove every blackhead in sight, it’s important you understand where they come from. Somerville explains, “Blackheads form when extra sebum accumulates in the pore, and mixes with debris or dead skin cells, which then oxidizes and hardens.”
What happens if you don’t remove blackheads?
Blackheads are a type of acne, and if left untreated, they can stretch out the skin around the pore. Somerville adds, “Blackheads can also be stubborn after extractions. Since the pore may not close up right away, it could lead to sebum filling the pore again and leading to another blackhead forming.”
How do you remove blackheads?
The best way to remove blackheads is to prep the skin with light exfoliation in the shower. Somerville recommends her own ExfoliKate, which removes the top layer of dead skin. It contains resurfacing ingredients like papaya, pineapple, and pumpkin enzymes, as well as lactic acid. “Additionally, steam from the shower helps warm the skin, which softens and opens up pores for easier extraction,” Somerville adds.
“After you shower and dry your skin, wrap your fingers with tissue paper and gently squeeze the blackhead out of the pore,” Somerville instructs. “If you’re heavy-handed, you can squeeze the blackhead out with Qtips.” Be sure to then treat the area with a witch-hazel soaked cotton pad to soothe the skin, she says.
Are extraction tools safe to use at home?
“I also don’t recommend extraction devices, as they can be too abrasive and take off the top layer of skin,” Somerville says of using tools instead of just your fingers. Step away from those pore strips, too. “The best way to fully extract the blackheads using your fingers. Pore strips and peel-off masks can often only take off the top layer of the blackheads and not fully remove it,” she explains.
ADVERTISEMENT – CONTINUE READING BELOW
She also adds that the worst way to remove blackheads is pinching at it without any preparation. As she mentioned before, properly cleansing, exfoliating and steaming will open up the pores, making extraction more gentle.
How do you prevent blackheads from forming?
There’s no big secret—just consistency. “The best way to prevent blackheads is a good, consistent routine of cleansing and exfoliation,” says Somerville, who suggests a cleanser with sulfur for treating acne and drawing out impurities. She also notes that family genes can play a significant role in acne in general, including blackheads. “My mom struggled with blackheads, and I have struggled with blackheads growing up as well,” she admits. You can’t fight genetics, but with these tips, you’ll at least have a leg up.
Homemade pore extractor
One of the most basic pieces of advice I give out as an esthetician is that dealing with a blackhead when it’s just a blackhead is the best thing you can do for your pores. Open comedones, or blackheads, are clogged pores filled with sebum (oil), dirt/makeup, and dead skin cells that oxidize when exposed to air.
If left to sit around for too long, they move deeper into pores and can rupture, become infected with bacteria, and develop scarring inflammation. Some theories suggest that all acne originates as a micro-comedone.
So, by treating blackheads in their earliest stage, you may prevent more severe breakouts! Regularly cleaning out clogged pores is crucial for overall skin health.
Blackheads also fill and expand pores, and the longer they remain in the pore, the larger the blackhead can become, and the larger your pore will stretch. Oily skin usually means larger pores, and the risk for blackheads is greater. If you have oily skin, you may wonder if that will ever change.
Often as we age, our oil glands slow down and we produce less oil, so it’s not necessarily “once oily always oily,” I can assure you. These simple do-it-yourself blackhead-fighting masks are ideal for oily or acne-prone skin, no matter what stage in life you are in.
See also
Get Glowing Skin for Fall with 8 Pumpkin Mask Recipes

how to floss teeth without floss
It’s the dreaded question at every dentist appointment: Have you been flossing?
You know flossing is important, but you just can’t bring yourself to commit to a regular flossing routine. It turns out you’re in good company! According to the ADA, only 16% of Americans floss their teeth at least once a day.
But flossing is incredibly important to your overall oral health and general wellness. Even if you hate flossing, try flossing with one of these three alternatives to keep your smile bright.
Why Does Flossing Matter?
You wouldn’t wash only half your face or scrub grime off half of a dirty dish, yet that’s exactly what you do to your teeth when you skip flossing.
Brushing can only remove plaque and debris from the visible surfaces of your teeth. Flossing is critical to scrape bacteria from in between your teeth. Plaque loves to accumulate in those dark crevices, and only the action of flossing can reach into those tight spaces and remove plaque, bacteria, sugar, and acids.
The Dangers of Not Flossing
If you’re serious about keeping your mouth as healthy as possible, flossing isn’t optional. It’s the only way to remove plaque from between the teeth. When plaque has the opportunity to accumulate around the teeth and gums, serious problems may occur.
This sticky film of bacteria accumulates everywhere it can, including on your teeth, between your teeth, and below the gum line. Plaque is technically a microbial biofilm that contains a diverse range of bacteria strong enough to resist antimicrobial agents and continue thriving in the dark crevices of the mouth.
If your brushing and flossing habits fail to remove plaque from your teeth and gums on a regular basis, the sticky substance hardens into tartar. This doesn’t take long- even just one day of plaque accumulation can morph into hard tartar crystals as minerals in your saliva combine with the plaque.
Tartar, also known as dental calculus, isn’t sticky or colorless like plaque. It’s a hard, crusty, yellow or brown substance that bonds harshly to your teeth. This makes tartar difficult to remove and highlights the importance of preventing it altogether. There’s no way around it: plaque and tartar both pose serious threats to your teeth, gums, and overall health.
Plaque’s acidic base slowly but surely eats away at your tooth enamel and destroys the healthy structure of your teeth. Cavities offer the first warning sign of plaque damage. While one isolated cavity might not be too bad, the ongoing presence of plaque eventually causes more serious problems like gingivitis, the first stage of gum disease.
If tartar continues to accumulate and your gingivitis is left untreated, it progresses into the more severe form of gum disease called periodontitis. More than 64 million American adults have periodontitis defined by the following signs:
- Pockets between the gums and the teeth
- Recurring gum abscesses
- Loose and shifting teeth
- Receding gums
- Tooth loss
- Degeneration of the jawbone
The good news, at least, is that flossing is an easy yet powerful way to fight against plaque, reduce tartar, and keep your smile intact.
Three Flossing Alternatives That Still Work
It’s okay if you hate traditional floss; you’re definitely not alone. Try one of these three flossing alternatives instead to efficiently remove bacteria from between your teeth.
Water Flossers
Water flossing offers a simple way to floss without thin floss thread. This type of handheld device removes plaque by spraying streams of water between the teeth. The steady pressure of water directed to the space between each tooth effectively targets food debris, sugar, bacteria, and other substances.
For best results, choose a water flosser with the ADA’s Seal of Acceptance. The ADA Seal f Acceptance confirms the flosser has been tested to prove its safety and efficacy. Research shows that ADA-approved water flossers reduce the risk of gingivitis.
Interdental Brushes
Not a fan of water flossers? Perhaps interdental brushes will do the trick for you instead. These thin, cone-shaped brushes are designed with wire and bristles, making them easy to insert gently between the teeth.
Interdental brushes are available in many different shapes and sizes, so you can select the type that works best with the alignment of your teeth. You shouldn’t have to force interdental brushes between your teeth; they should fit comfortably between each space to remove plaque buildup.
Honey is not only antibacterial but naturally unclogs pores as well. Using clean fingers, on a clean, dry face, apply small amounts of raw honey to your middle and ring fingers and gently pat on the skin where blackheads are present.
Repeat, concentrating on the chin, forehead, and nose areas, being careful to avoid the under-eye area as bruising can occur. Pat for 1–3 minutes total, not in the same area. Gently wash your face with warm water when finished.
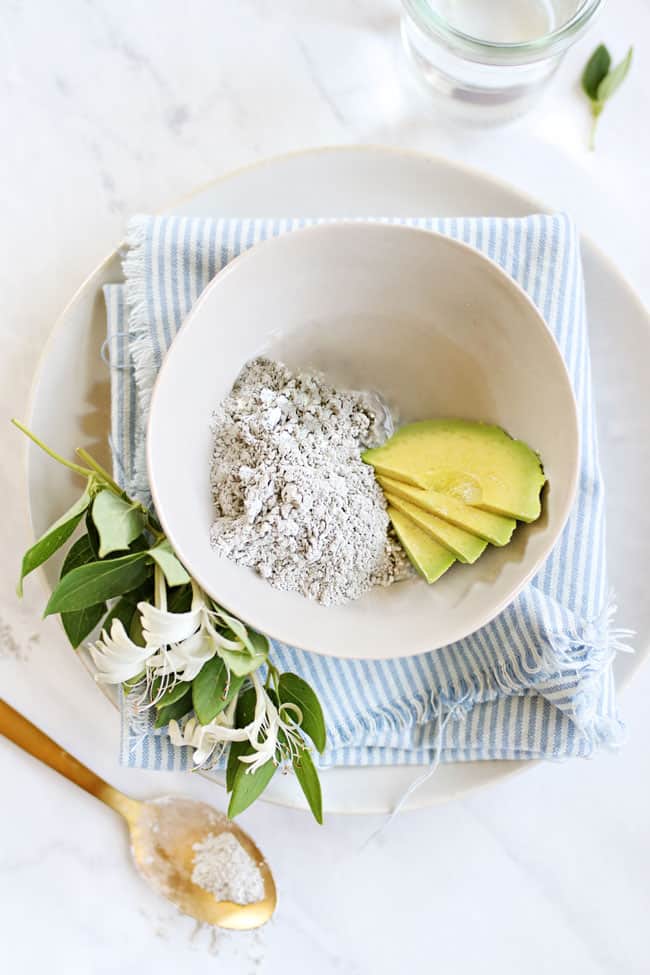
2. Clay Blackhead Mask
Clay is a wonderful ingredient to battle blackheads, drawing out impurities and unclogging pores. Moroccan red clay comes from the Atlas Mountains in Morocco and is ideal for oily and acne-prone skin.
- 2 tablespoons Moroccan red clay
- 3 tablespoons rose water
- 1 teaspoon mashed avocado
Combine these ingredients to create a paste. Using clean fingers or a brush, apply mask to the t-zone or acne-prone areas. As soon as the mask starts to lighten (a sign it is dry), rinse with warm water.
Avoid using a metal bowl or spoon for this recipe—instead, use glass or wooden instruments to maintain the potency and effectiveness of the clay’s properties.

3. Activated Charcoal Blackhead Mask
Drawing impurities and bacteria to the skin’s surface, activated charcoal scrubs are a fantastic oil blasting recipe for blackheads. Use once or twice a week to fight blackheads and dislodge the gunk from those pesky pores.
- 2 tablespoons unscented liquid Castile soap
- 1 tablespoon almond, jojoba, apricot kernel, or vitamin E oil
- 2 tablespoons finely ground brown or white rice flour
- 1 tablespoon baking soda
- 2 teaspoons activated charcoal powder
See also
Our 3 Best Essential Oils for Acne + a Tea Tree & Clay Acne Mask
In a small bowl, stir together the Castile soap and oil. Add the rice flour, baking soda, and activated charcoal powder. The mixture may bubble up a bit. Keep stirring until smooth and creamy. Transfer to an airtight container and store in a cool, dry place.
To use, splash your face with a little water, so it is damp. Take 1–2 teaspoons of the scrub and gently apply to the face with your fingertips in small, circular motions, being careful to avoid the area around the eyes.
To use as a mask, let the scrub sit on the face for a few minutes for extra oil-absorbing benefits. Rinse with lukewarm water, and pat your face dry. If the scrub becomes too dry, add a little water or almond oil, and stir again until creamy.
4. Egg White Blackhead Mask
Regularly using a deep cleansing mask designed to control oil accumulation in your pores is crucial to keeping blackheads at bay. This mask should be applied at night once a week since the lemon juice can make skin photosensitive (caution with sun exposure, especially if you have a history of photosensitivity, as it may lead to skin hyperpigmentation).
- 1 egg white
- 1/2 teaspoon clay powder
- 1/4 teaspoon lemon juice
Calm Troubled Skin With This Anti-Inflammatory Turmeric Mask
Beat the egg white until fluffy and then add in the clay and lemon juice and mix well. It will form a paste that you will apply to your t-zone area or any other areas prone to blackheads.
If it’s a bit thick, which will depend on the type of clay you use, add a 1/2 teaspoon of water. After 10 minutes, rinse with warm water. Follow with an appropriate nighttime facial oil or moisturizer.
5. Baking Soda Blackhead Scrub
Combine the baking soda and raw milk in a bowl, and then gently scrub the areas with clogged pores and blackheads. Apply gentle pressure in a circular motion with your fingertips.
If you allow this scrub to partially dry, it becomes more of a gommage that you can gently remove in circular motions with your fingertips. Remove the excess with warm water.
- 2 tablespoons baking soda
- 2 tablespoons raw milk
- Add an activated charcoal capsule for extra cleansing power