If you’re new to eyeliner pens and want to know how to use them, you’re in the right place. There are many different types of eyeliner pens available on the market, but they all have a few things in common. They are usually made from metal or plastic and have a fine tip that allows you to create thin lines or thick lines depending on how far away from your eye you hold it.
Eyeliner pens are perfect for people who are just starting out with makeup because they are easy to use and create a clean line. The only thing you need to remember is that your hand should be steady when applying eyeliner so it doesn’t look wobbly or uneven.
Read on to learn more about How To Use Eyeliner Pen For Beginners, How to Apply Liquid Eyeliner if You’re…a Beginner and How to Floss With Braces Using a Floss Threader

How To Use Eyeliner Pen For Beginners
Liquid eyeliner is one of the best makeup products to have in your beauty arsenal for creating flawless cat-eyes, graphic wings, and statement lines.
While you might think learning how to apply liquid eyeliner is tricky, with a little bit of practice, you can master any eye makeup look with ease using liquid eyeliner—whether you’ve been using liquid eyeliner for years, or just got one in your IPSY Glam Bag.
Here are three liquid eyeliner makeup tips for every eye shape and skill level.
About the Expert:
Jessica Thomas is an Ohio based freelance makeup artist. Her work can be seen in editorial spreads, in your favorite TV shows, and on the runways at New York Fashion Week.
Types of Liquid Eyeliner
1. Brush-Tip Liquid Eyeliners
These liquid eyeliners, such as KVD VEGAN BEAUTY Tattoo Eyeliner, have loose, flexible bristles that are similar to a paintbrush. For this reason, brush-tip liquid eyeliners can take a bit more practice for beginners to get the hang of, but are excellent for creating varying eyeliner widths—whether you’re going for a thicker, bolder wing or just a thin, elegant sweep across your lash line.
“I feel brushes are easier for me solely because you can control the amount of product on the brush! With some liner pens once you apply the product, sometimes too much can be released with the felt tip, which then can throw off your whole liner application,” says Jessica.
2. Felt-Tip Liquid Eyeliners
Eyeliners like MORPHE’s Felt-Tip Liquid Liner are stiffer than liquid liners with brush tips, and as such, are great for creating thick, intense winged eyeliner looks. Because the tip is solid and not made up of bristles (like a brush-tip applicator is), felt-tip liquid eyeliners can have a higher color payoff (that is, the pigment will appear darker on your skin) and can be easier for beginners to control, especially if you’re going after a sharp, more defined cat-eye look.
Of course, deciding to use a liquid liner with a brush tip or felt tip will depend on the type of look you’re trying to create, and your level of comfort with each applicator.
How to Apply Liquid Eyeliner if You’re…a Beginner
“A fun tip that I tell anyone who is struggling with liner is to apply it with your eyes open! Nothing is worse than doing your best liner job and then opening your eyes and seeing it transferred all over your lid,” says Jessica. But, if you mess up, it isn’t anything a little q-tip and makeup remover can’t fix.
If you haven’t had much practice with liquid eyeliner, never fear—we’re here to take the guesswork out of your eyeliner application. The following technique is ideal for beginners or those with shaky hands, and works especially well on monolid, round, and almond eye shapes.
“Holding makeup brushes towards the end instead of close near the actual hairs gives you way more control and fluidity of the brush itself,” says Jessica. If you have shaky hands, this tip will aid you in drawing a straight line.
Technique #1: The Connect-the-Dots
- Start by resting the elbow of the arm you’ll use to apply your eyeliner on a flat surface in front of a mirror.
- Hold the liquid eyeliner like a pencil, and anchor your pinky on your cheek–again, this should be the pinky of your hand you’re using to apply your eyeliner with.
- Look straight ahead, or tilt your head back slightly and look down at the mirror: whichever allows you the best view of your upper lash line.
- Begin by making little dots or dashes as close to the lash line as possible, keeping the brush level with your eyes.
- When you get to the end of your upper lash line, continue the dots at a slight angle toward the end of your eyebrow, going as far as you’d like. Using short, feathery strokes, connect these dots to create a slight wing. “I like to start winging the liner right before I get to the end of the eye,” says Chinchilla. “Most eyes dip down at the end, so it’s best not to follow the dip with eyeliner. There are no rules to where your wing should stop though. Make it as short or long as you’d like. It’s always best to start small, and graduate to more dramatic liner looks.”
- If you have a monolid eye shape or not much eyelid space, start your wing from the bottom eyelashes instead. Work from the outer edge of your lower lash line up towards the end of your eyebrow, then sweep in to meet your upper lash line. Fill in the empty space, and you have a beautiful graphic wing shape.
- Finish the look by applying eyeshadow in a similar color to set the line, and apply mascara.
How to Apply Liquid Eyeliner if You’re…Intermediate
Maybe you’ve used liquid eyeliner a few times before, or even everyday, but you still find yourself having to erase some mishaps with makeup remover or concealer more often than you’d like. This technique is great for those who have some experience with liquid eyeliner, or if you have almond or upturned eye shapes.
Technique #2: The Inside-Out
- Rest your elbow of the arm you’ll be using to apply your eyeliner on a flat surface in front of a mirror.
- Look straight ahead, or tilt your head back slightly and look down at the mirror, until you have a clear view of your upper lash line.
- Begin at the center of your eyelid. Resting your pinky on your cheek if you need, draw a single line from the top of your lash line toward the outer corner of your eye.
- Then, draw a second line from the center of the lid out, but at a slightly steeper angle than the first so that the two lines create an unfilled triangle when they meet at the outer corner of your eye.
- Fill in the triangle by using long, fluid strokes from the outer corner of your eye towards the inner corner. Make sure the eyeliner tip stays as close to the lash line as you can get, especially as you move closer towards the inner corner of your eye.
- For a more dramatic or graphic look, line the bottom lash line with the eyeliner, then sweep up at the outer corner to connect to the thickest part of the wing on the upper lash line (so that it looks like the wing is extending from the lower lash line as well).
- Finish by setting the line with eyeshadow in a similar color and applying a few coats of mascara.
How to Apply Liquid Eyeliner if You’re…a Pro
Who needs a professional makeup artist? When it comes to liquid eyeliner, you’re calm, cool, collected, and ready to rock any look you dream up. The following technique is a quick and easy way to expand your makeup look toolkit, and is great for those with steady hands and almond or downturned eye shapes.
Technique #3: The Outside-In
- Rest your elbow on a flat surface in front of a mirror for best control.
- Look straight ahead or tilt your head back and look slightly down at the mirror–whichever you’re used to!
- Beginning at the outer corner of your eye, sweep the liquid liner from the outer corner in, towards the eyelid but staying close to the lashline.
- Repeat the stroke, but this time, don’t meet the upper lash line until you’ve reached the center of your eyelid, so you’re left with an unfilled triangle.
- Fill in the triangle by continuing to sweep the brush toward the inner corner of the eye. As always, keep the liner as close to the lashline as you can.
- If you want your eyes to appear more elevated, don’t bring the liner all the way to the inner half of your eye. Instead, slowly taper the liner so it disappears near the middle of your upper lash line.
- Set the liner with eyeshadow and finish up with mascara.
Want to learn more makeup application hacks and the best products to do them with? Take our Beauty Quiz now to get started. Already an Ipster? Refer your friends to earn points, which you can use toward products. Either way, don’t forget to check us out on Instagram and Twitter @IPSY.
How to floss with braces platypus
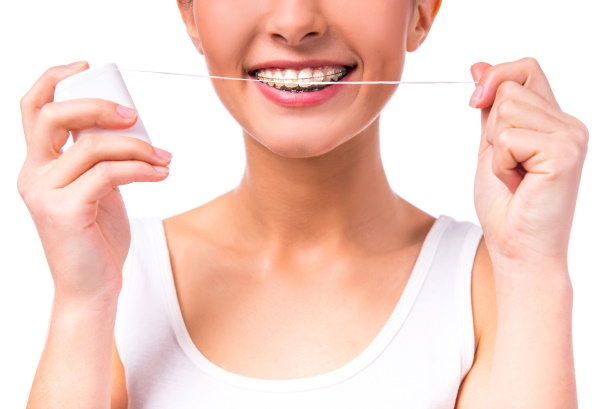
How to Floss With Braces
by Dr. Tyler Coles – Premier Orthodontics
Ask anyone what the hardest part about braces is, and they’ll usually give you the same answer: flossing.
One study shows that only 30% of Americans floss their teeth when they don’t have braces…
…so you can bet that it’s even less when someone has another obstacle, like braces on their teeth to get around.
Why is Flossing With Braces So Important?
According to the American Dental Association, “Cleaning between teeth removes plaque that can lead to cavities or gum disease from the areas where a toothbrush can’t reach.”
In other words, flossing removes plaque and helps prevent cavities and gum disease.
If someone has braces, the risk for plaque buildup, cavities, and gum disease increases dramatically. If you invested in braces to make your teeth straight then shouldn’t you want them to remain clean and healthy in the process?
That’s why we want to show you the easiest, most effective ways to floss your teeth with braces.
How to Floss With Braces Using a Floss Threader
Before you pick up some regular floss, you need to know that it doesn’t work quite the same way if you have braces…
An extra tool is required in order to get the floss beneath the archwire. This tool is called a floss threader.
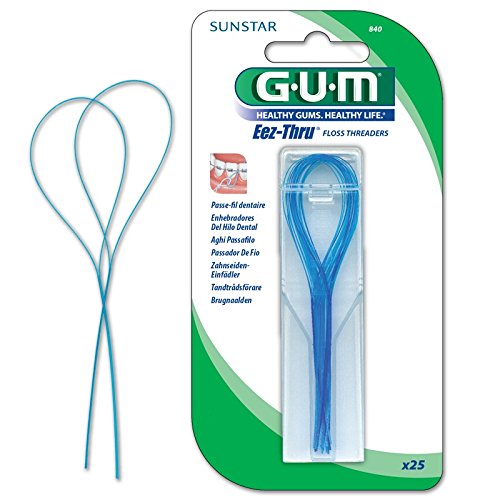
The best way to picture a floss threader is to first imagine a needle and thread. The floss threader will act as the needle, and your floss will be the thread.
First, pass a piece of floss through the floss threader…
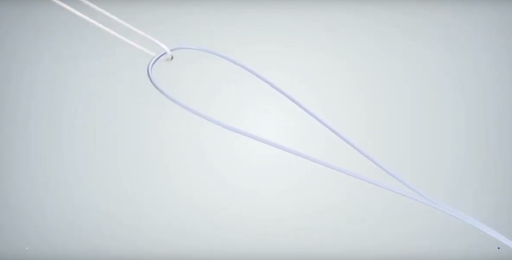
…and then using the floss threader, “thread” the floss beneath the wire.
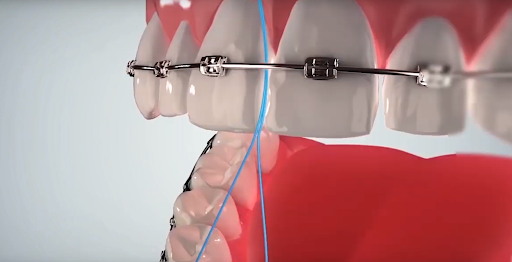

Once you have the floss beneath the wire, you can floss as you normally would.
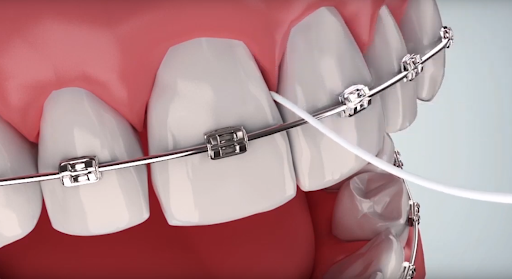
After you have flossed one tooth you will need to repeat this process for each tooth.
The Pros of Using a Floss Threader to Floss With Braces:
- Very Inexpensive – Your orthodontist will likely give you a pack for free (or you can pick some up for a few dollars on Amazon or at a drug store)
- Reusable – One pack will likely last you months or years
- A Process You’re Already Used To – No special tools are needed, just the threader and floss.
The Cons of using a Floss Threader to Floss With Braces
- Tricky To Use At First – This is especially true for younger kids. Using the floss threader requires some hand skills that may prove difficult for young children.
- Takes Longer Than Normal Flossing – . Because you have to repeat the process of flossing beneath the wire for every tooth in your mouth, this can be a time consuming process.
Check out our video about brushing and flossing with braces! It demonstrates exactly how floss threaders are used.
Overall, using a floss threader to floss with braces works well and many patients choose this option for its cost-effectiveness. But if you’d like to find a faster or easier option, keep reading below…
How to Floss With Braces Using Superfloss
Superfloss is essentially a piece of floss with one stiff end.
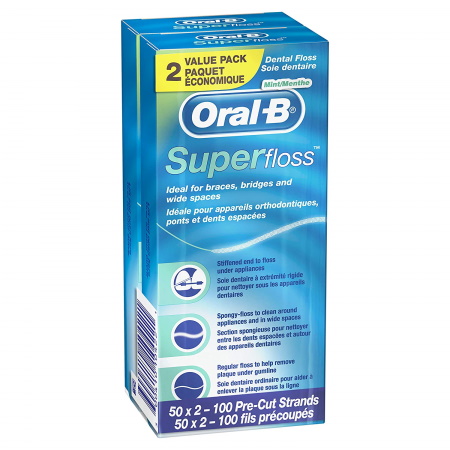
Superfloss works similarly to a floss threader, only you don’t need to do the “needle and thread” process. You simply take the stiff end of floss, guide it beneath your archwire, and floss your teeth.
The Pros of Using a Superfloss to Floss With Braces:
- Easier Than a Floss Threader – Most kids and adults figure this method out pretty easily.
- Easy To Find – It can be purchased on Amazon or at your local drug store
The Cons of using a Superfloss to Floss With Braces
- Also Time Consuming – Because you have to repeat the process of guiding the floss beneath the wire, it does take a little bit of time.
- Not Reusable – Super floss is a one-time use product, so each day you will use a new piece and throw it away. This product isn’t too expensive, but while you are in braces you will likely need several boxes to get you by.
Superfloss is a great tool that cleans well. Grab a pack next time you’re at the drug store and try it out for yourself!
How to Floss With Braces Using a Platypus Orthodontic Flosser
Platypus Orthodontic Flossers are one of the quickest, and EASIEST ways to floss with braces.
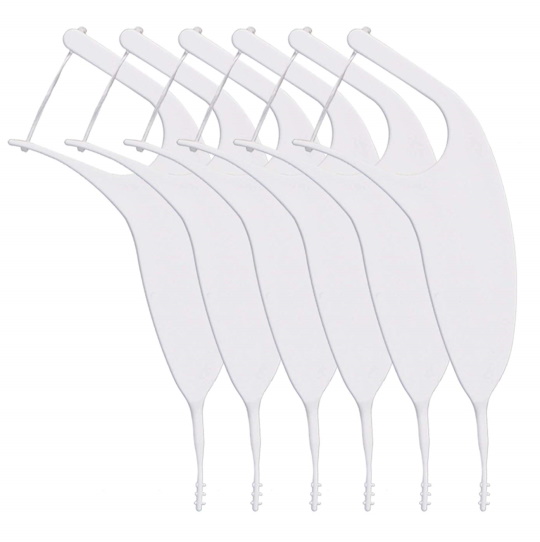
There is no threading required with the platypus orthodontic flossers. The narrow side of the flosser is designed to fit behind the arch wire, allowing you to floss your entire mouth in no more than two minutes (usually less)!
The easiest way to understand how the Platypus Orthodontic Flosser works is to see it in action. Click below to watch a video about how to floss with braces using the Platypus Orthodontic Flosser.
The Pros of Using a Platypus Orthodontic Flosser to Floss With Braces:
- Fastest Method – You can floss your entire mouth in two minutes or less.
- No Threading Required – This makes it easier for young kids who may struggle with the floss threaders on their own.
The Cons of Using a Platypus Orthodontic Flosser to Floss With Braces
- Cost More Than Floss Threaders – The Platypus Orthodontic flossers are a one-time use product, so each day you will use a new flosser and throw it away. This product is still reasonably priced, however, and you can buy them in larger packages to save money.
- Difficult To Find In-Store – This is most likely a solution you will need to order online. You can find them on Amazon with free shipping and in multiple package sizes.
How to Floss With Braces Using a Harp Orthodontic Flosser
The Harp Orthodontic Flosser is very similar to the platypus flosser – it too allows you to floss without threading. You simply guide the small end of the flosser beneath the archwire to floss your entire mouth; no threading required!
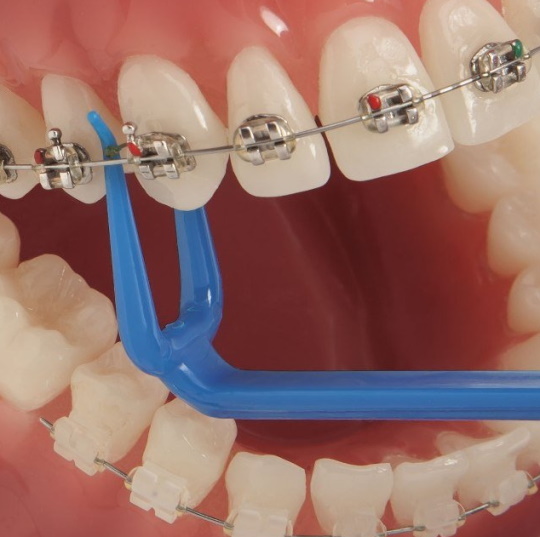
Watch the video below to learn more about the harp flosser and to see it in action.
The Pros of Using a Harp Orthodontic Flosser to Floss With Braces:
- Quick And Easy – You can floss your entire mouth in two minutes or less.
- No Threading Required – This makes it easier for young kids who may struggle with the floss threaders on their own.
- Reusable For Up To A Week – , This means less total flossers you will have to buy throughout the time you have braces.
The Cons of Using a Harp Orthodontic Flosser to Floss With Braces
- Cost More Than Floss Threaders – Harp Flossers cost more than floss threaders, but they are still very reasonable. To get a month’s supply of Harp flossers it comes out to about $5!
- Difficult To Find – They can’t be found at local drug stores or on Amazon, but you can order them direct on the Harp company website.
How to Floss With Braces Using a Waterpik or Water Flosser
A Waterpik is a popular brand of water flosser. A water flosser is a device that delivers a stream of pressurized pulsating water between your teeth, along the gum line, and around your braces. If you find that string floss, no matter the type, is too difficult to do on a daily basis, then a water flosser might be a good choice for you!
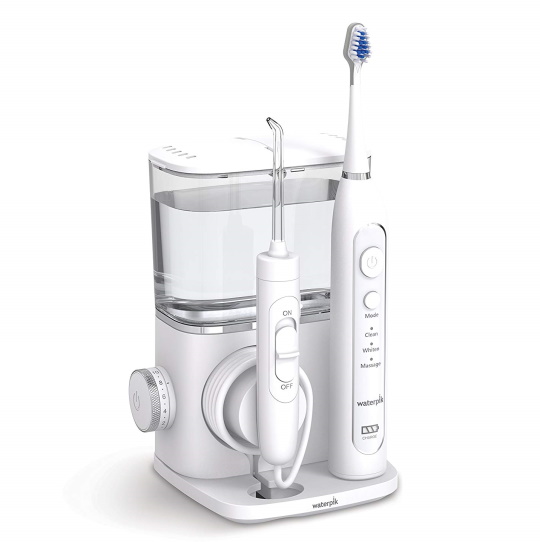
In addition to cleaning between your teeth like floss, a water flosser can also help remove food debris along the gum and around the braces. Watch the video below to see how a water flosser can help you floss with braces and keep your braces clean.
The Pros of Using a Waterpik or Water Flosser to Floss With Braces:
- No String Required – If you or your child struggles with string floss, a water flosser is likely the best answer. It’s quick, easy and lets you floss your entire mouth in two minutes or less.
- Helps Around The Braces And Gum Line – String floss just can’t get to these areas.
- Easy To Find – You can pick Waterpiks or water flossers up at your local drug store or online.
- One-Time Investment – One unit will last the entire time you’re in braces—plus a long time after that! This is also the most eco-friendly choice, as it allow you to entirely eliminate trash waste from your flossing routine.
The Cons of Using a Waterpik or Water Flosser to Floss With Braces
- Most Expensive – Portable units start around $30, and counter top units may cost up to $70. But remember, you never have to replace it while you’re wearing braces.
- Not Portable – A water flosser does require you to be near a sink in order to use it.
No matter which type of floss you choose . . . there’s no doubt that flossing with braces is crucial to maintaining healthy teeth, healthy gums, and avoiding bad breath with braces.
With the tools listed above, you’ll find it easier and less time consuming than ever to floss with braces.
Flossing with braces hurts

It’s important to keep your braces and teeth properly clean. Otherwise, you may end up with gum disease and decalcification of your teeth! Cleaning teeth in braces isn’t hard; it just takes time and patience. When you first get your braces on, brushing and flossing will probably take 10 to 20 minutes. As you get used to your braces and time passes, you’ll get faster at it.
The first few days after you get your braces, your teeth and gums may be very sensitive. It may be extremely difficult to brush and floss properly because of this sensitivity. Just do your best. You may need to take a break from flossing for a few days until the initial pain and sensitivity subside.
How often should you brush your teeth? Ideally, after every meal and snack. Of course, that may not be realistic. Just brush as often as you can. In between, swish water in your mouth or just rinse and spit a few times. Make sure that you floss at least once a day.
Steps For Keeping Your Braces Clean
You can find many of the products mentioned in your local drugstore or here at DentaKit.com:
- Rinse your mouth with water to help dislodge any food particles that may be stuck in your braces. Give it a few really good rinses.
- Use a dental pick or a spiral inter-proximal brush to dislodge any large visible food particles, and rinse again. Just poke the little brush or dental pick under the arch wire between each bracket. There are a number of dental picks and small spiral brushes available, in different sizes and types. Our favorite dental pick is the Pick-a-Dent, and our favorite inter-promial brushes are the Proxi-Tip, the SulcaBrush, and the Tip-a-Dent. After you dislodge the food particles, rinse with water once or twice. Now you’re ready to brush.
- Put a small amount of toothpaste on your toothbrush. It’s better to use a regular “non-whitening” toothpaste; otherwise your exposed teeth could end up whiter than the teeth beneath your brackets! An orthodontic v-trim toothbrush isn’t absolutely necessary, but it does help. Brush the brackets on each tooth both up and down and side to side. Angle the toothbrush so that you get underneath the brackets to ensure that all surfaces are clean. Sometimes brushing in a circular motion over each tooth is helpful. If you have an electric toothbrush, follow the manufacturer’s instructions for cleaning your braces. Don’t forget to brush your molars and your tongue, too!
- Floss at least once a day. The floss must go underneath the arch wire of each tooth. You need to poke the floss underneath the arch wire, floss the tooth, then remove the floss, and repeat the process on the next tooth. This can get tricky, especially for the back molars. Fortunately, there are several products which can help you. You can use any floss you like with a Floss Threader Needle or the FlossFish tool. Several brands of floss have a built-in stiff end, such as Oral-b Crest Glide Threader Floss. INo matter what type of floss you use, just go slowly and be patient with yourself. Flossing braces is one of the most frustrating parts of the entire process, especially at first. As time passes you’ll get better and faster at flossing.
- Consider an Oral Irrigator, especially if you can’t floss well. Oral irrigators don’t take the place of flossing, but you can add irrigation to your routine to ensure that your teeth and gums stay super healthy. We sell a great oral irrigator made by Oral Breeze which hooks up to your bathroom faucet.
When you have braces, consider getting your teeth professionally cleaned by your dentist more often. When I had my braces, I got four cleanings per year instead of the usual two cleanings. Cleaning your teeth more often will ensure that you don’t get any “bad surprises” whe