Ingrown toenails are painful and uncomfortable. They can also cause infections, which is why you should see a doctor if you experience one. However, there are some things you can do at home to reduce your chances of getting an ingrown toenail and make it easier if you do have one.
One way to reduce the risk of getting an ingrown toenail is by using dental floss. It helps loosen the skin around your nail so that it doesn’t grow into the skin surrounding it. This reduces the likelihood that the toenail will become infected and painful.
Rad on to learn more about How To Use Dental Floss For An Ingrown Toenail, How To Floss Back Teeth With Floss Picks

How To Use Dental Floss For An Ingrown Toenail
You may have googled home remedies for ingrown toenails if you have pain in toenail side, and some of you may have seen a remedy by using dental floss. But it really does work? Let’s see the details, Pros and Cons of dental floss remedy.
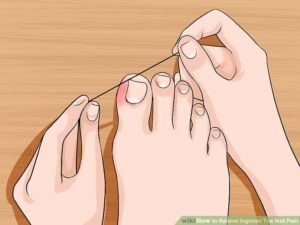
Mayo Clinic recommends using waxed dental floss to lift up the edge of a curved toenail. But you must be sure that the toenail should be softened after soaking your foot and using a piece of clean dental floss.
There’s the other dental floss remedy which uses a dental floss pick. Similarly, it is recommended to use for separating the ingrown toenail from your irritated skin. Dr Silvester of Next Step Foot & Ankle Clinic suggests that using a toothpick to push the edge of the nail away from the skin and then place a bit of sterile cotton under the toenail near the affected area.
・
However, not every medical organisation agrees with these ideas. American College of Foot and Ankle Surgeons sound an alarm bell on the risk of bacterial growth by placing cotton under the nail.
Yes, it’s understandable that you want to find a solution without visiting a practitioner though, such home remedies make the painful condition worse rather than better.
BS Brace, a fibreglass thin toe brace, can also lift nail edges by the inherent nature of the material. Lifting it by as much as 5 mm, and straightening the curved nail back into its original shape, and of course, you don’t need to worry about infections because it’s provided by accredited clinics and practitioners. The mounting the brace takes approximately 10 – 15 minutes so you might think that it’s easier, quicker and safer than home remedies.
How To Floss Back Teeth With Floss Picks
Flossing is an important oral hygiene habit. It cleans and dislodges food stuck between your teeth, which reduces the amount of bacteria and plaque in your mouth. Plaque is a sticky film that builds up on teeth and contributes to cavities and gum disease.
Although many people brush their teeth daily, not everyone flosses their teeth as regularly as they brush. According to a national poll, about 4 in 10 Americans floss their teeth at least once a day, and 20 percent of Americans never floss at all.
Of course, it isn’t enough to simply floss. It’s important to floss correctly. Improper flossing can potentially damage your teeth and gums. So, if you’re unsure about the right way to clean in between your teeth, here’s a step-by-step guide on the best way to floss.
Flossing: What are the steps to follow?
Follow this step-by-step guide to floss your teeth correctly.
Flossing instructions
- Break off about 18 to 24 inches of dental floss. To hold the floss correctly, wind most of the floss around both of your middle fingers. Leave only about 1 to 2 inches of floss for your teeth.
- Next, hold the floss taut with your thumbs and index fingers.
- Place the dental floss in between two teeth. Gently glide the floss up and down, rubbing it against both sides of each tooth. Don’t glide the floss into your gums. This can scratch or bruise your gums.
- As the floss reaches your gums, curve the floss at the base of the tooth to form a C shape. This allows the floss to enter the space between your gums and your tooth.
- Repeat the steps as you move from tooth to tooth. With each tooth, use a new, clean section of floss.
What’s the best way to floss with braces?
Flossing with braces can be tricky, and it takes more time than flossing without braces. If you use regular floss, give yourself 10 to 15 minutes to floss your teeth.
With this method, choose waxed floss, which is less likely to tear and get stuck in your braces.
Flossing instructions for braces
- Break off about 18 to 24 inches of waxed dental floss.
- Stand in front of a mirror so you can make sure the floss is going where you need it to.
- Start by threading the floss between your teeth and the main wire. Twist the loose ends of the floss around your index fingers so you can move the floss around easily.
- Press the floss between the two teeth as gently as you can. Then, move the floss up and down along the sides of both teeth.
- When working on your top teeth, try to make an upside-down U with the floss. To do this, go up the side of one tooth until you get to the gumline. Then, glide the floss down the side of the other tooth.
- Gently remove the floss and carefully unthread it from behind the wire. Avoid popping the floss out of your tooth, as you could dislodge a wire.
- Now, move on to the next two teeth, and use the same technique until you’ve flossed between all your teeth.
Instead of using waxed floss, other options that work well for flossing if you have braces include using a Waterpik, a type of water flosser, or a floss threader, a small tool that helps you thread floss under your braces. Both can save you time with flossing.
When should you floss?
Knowing the right time to floss also contributes to good oral health. Some people have a routine of brushing their teeth first and then flossing. However, it’s generally recommended to floss and then brush your teeth.
Flossing helps lift and release food and plaque stuck in between your teeth, while brushing removes these particles from your mouth. If you brush first and floss afterward, food and plaque remains in your mouth until the next time you brush.
The American Dental Association recommends flossing at least once per day and brushing twice per day.
Types of dental floss
Dental floss comes in many varieties. Which type of floss is best for you depends on your preferences, the amount of space in between your teeth, and whether you have braces or bridges.
Some dental floss is easier to use in wider spaces, whereas other types of floss are easier to use in tighter spaces.
Different types of dental floss include:
- Dental tape. This type of dental floss is broader and flat like a ribbon, making it easier to handle if you have braces, gaps, or large spaces in between your teeth.
- Standard floss. This is a thin, nylon strand that can fit in between teeth. It comes flavored or unflavored as well as waxed or unwaxed. If your teeth are crowded or closer together, dental floss with a wax coating can make it easier to get in between them.
- Super flosses. This dental floss threader can work with braces, bridges, and gaps. It has three components: a stiffened end for flossing underneath appliances, spongy floss to clean around your appliances, and regular floss to eliminate plaque underneath your gumline.
Other tools to make flossing easier
In addition to dental tape, waxed floss, and floss threaders, other tools can make flossing easier and faster.
- One option is to use an electric flosser or a water flosser, which uses water and pressure to remove plaque and food from in between teeth. Both are great options if you have trouble using regular floss. A water flosser is also useful if you have braces. This device can clean in between brackets and wires.
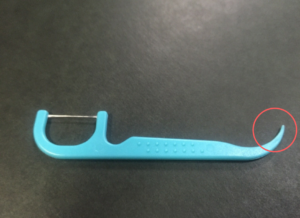
- Another option is to use disposable floss picks. They’re easy to maneuver and can help you floss hard-to-reach teeth in the back of your mouth.
Takeaway
Good oral hygiene involves more than just brushing your teeth. It also involves flossing and knowing how to floss correctly.
Flossing helps remove bacteria, plaque, and food from between your teeth, and it reduces the likelihood of tooth decay and gum disease. Along with regular brushing and flossing, make sure you also schedule regular dental cleanings at least twice a year.
Cant floss back teeth

10 Common Flossing Mistakes
It seems so simple to just slide some string between your teeth to clean those hard-to-reach areas. While the idea is simple, there are a few techniques that you need to master in order to maximize the return on the time you spend flossing.
Here are ten common mistakes that people make when they floss:
1 – Not Flossing the Sides of Both Teeth
If you just slide the floss down, and then pull it up, you are only getting 50% of the job done. When you move the floss up between two teeth, you need to make sure that you are cleaning the side of both teeth. One of the favorite places for plaque to hide is between teeth. If you’re only removing plaque from the side of one of the teeth, you could easily get a cavity on the tooth that you’re not flossing.
2 – Using the Same Section of Floss Between All of Your Teeth
When you floss you are removing bacteria from between your teeth and below the gum-line. If you use the same section of floss for all of the teeth in your mouth, you are spreading around a lot of bacteria. Of course you still are loosening the plaque, which has its benefits, but if you use a new section of floss each time you floss between two teeth, you will be loosening the plaque without putting plaque that you’ve already removed back in between your teeth.
3 – Snapping the Floss Down Hard Between Your Teeth
To get the floss to go between a tight contact between two adjacent teeth, try working the floss back and forth applying a firm but controlled downward pressure.
Snapping the floss down between the teeth can not only injure your gums in the short-term, but the trauma can cause your gums to recede. Do it enough, and you’ll cause gum disease.
4 – Not Flossing Behind the Very Back Teeth
Even though there isn’t a tooth next to it, it is still important to clean behind the four teeth that are all the way in the back of your mouth (two teeth on each side in the upper and lower jaws.) This can help remove bacteria that has made its way between your tooth and gums.
5 – Flossing Aimlessly Without a Plan
When you floss, you need to have a road-map of what order you are going to floss your teeth in, or you can quickly become confused and miss some teeth or even a quadrant of your mouth. It may be easiest to start in the upper right and go to the upper left, then come down to the lower teeth in the bottom left and move across to the bottom right.
However, as long as you have a plan, it really doesn’t matter which teeth you floss first. Personally, I start right in the middle of my upper teeth and work my way back on one side and then on the other. Then I do the same thing on the lower teeth. Just find a “floss order” that works for you and stick to it so that you don’t forget to floss any teeth.
6 – Not Flossing Around Dental Appliances
Many people don’t know that if they have fixed dental appliances in their mouth, they need to floss around them. For example, if you have a bridge, it is necessary to use a floss threader, or get something similar to Oral-B Superfloss.
I had braces on my lower teeth when I was a teenager. After I had them removed, the orthodontist cemented a wire that connects to each of my six lower front teeth. This stabilizes them, but also makes it impossible to use conventional floss due to the wire. Because of this, I have to use Superfloss or floss threaders to get under the wire so I can floss and maintain my gum health.
7 – Quitting When Your Gums Bleed
Blood may scare some people when they floss because they think that they are hurting their gums if they bleed. You are not hurting them as long as you’re not flossing too hard (see mistake #3.)
Most likely, the reason they bleed is because they haven’t been flossed in a while and the gum tissue has become red and inflamed. This is a condition known as gingivitis and it occurs because the body is sending more blood to the gum. This is to help the tissue fight all of the plaque that is accumulating. When you floss, you are removing that plaque, and since the tissue is inflamed and engorged with blood, you are causing some of the blood to leak out. After a few days, your gums should return to health and you can floss normally without any bleeding.
8 – Not Spending Enough Time With Your Floss
Most people have 28 teeth if they’ve had their wisdom teeth extracted. When you floss, you need to get both sides of the teeth (even the most posterior teeth – see mistake #4.) That means that there are 56 sides that you need to get. You should be spending a couple of seconds with each side, scraping up and down against the tooth a few times before moving onto the next surface. That means that it will probably take you around two minutes to floss your entire mouth if you have a full set of teeth.
9 – Not Applying Pressure to the Tooth Surface
When you floss, you want to be careful to avoid using too much downward pressure so you don’t damage your gums. However, when you are flossing against the side of a tooth, you want to make sure that you are pushing the floss against the tooth surface enough to be able to remove the plaque.
10 – Only Using Floss to Remove Food
Unfortunately, lots of people think that the only reason for flossing is to remove food that has gotten wedged between their teeth. I think many people end up doing this because they can see the food between their teeth — they can’t see the plaque. An easy solution to this problem is to use a plaque disclosing tablet/solution to visualize the plaque on your teeth.
When you floss, your primary goal should be to scrape against each tooth to remove as much plaque as you can. As long as you are doing this, you should be getting rid of the food between your teeth without even thinking about it.
Floss Correctly and Keep Your Teeth For Your Whole Life
By avoiding these ten common mistakes, you will be able floss more efficiently which will lead to greater oral health. Since many cavities start out between two teeth, you will be able to prevent many cavities by regularly flossing and avoiding these ten flossing mistakes.