How Will Insurance Cover A Breast Reduction>You should verify that your insurance will cover a breast reduction before proceeding with the procedure. We understand the significance of financial security in your life. That’s why we compiled this info to assist you learn more about breast reduction insurance coverage. You need to know what kind of breast reduction treatment you’re getting in order to understand how insurance will cover it. The two most common are:
Breasts can be made smaller and higher on the chest wall through a procedure called a reduction mammoplasty, in which the surgeon eliminates extra skin and tissue. In order to get a more natural appearance and a lower size after surgery, this is often combined with implants or fat transfer. A mastopexy is a surgical procedure in which extra skin and tissue under the breasts are removed, and the breasts are lifted and positioned higher on the chest wall by tightening the underlying muscle structure.
Breast size reduction surgery can be a huge expense for a woman. This type of surgery is considered elective and sometimes does not have insurance coverage. You’ll want to know how insurance will cover a breast reduction. You might need referrals from professionals, or prior approval by your insurance company before the surgery is completed. Your plastic surgeon or other professionals might be able to help in this area as well. Read on to learn more on breast reduction requirements weight/does insurance cover breast reduction for back pain.

How Will Insurance Cover A Breast Reduction
I recently saw a female college student as a new patient consultation in my office concerning possible breast reduction surgery. This procedure, also known as reduction mammaplasty, is indicated for the treatment of symptomatic macromastia (large breasts). The commonly reported symptoms related to macromastia are neck, shoulder and back pain caused by the weight of overly large breasts upon the musculoskeletal system. Other secondary symptoms can include breast pain and dermatitis or rashes beneath the breasts.
The college student was referred to me by her gynecologist and arrived with a prescription recommending a consultation with a plastic surgeon due to her condition. The patient was under the common impression that because she was referred to me by another physician, that the suggested surgery would automatically be covered by her health insurance plan. She came in hoping that the breast reduction surgery could be scheduled in four weeks, during her winter break from college.
After completing a patient history and regional breast examination, my staff discussed with her what would be needed to obtain insurance authorization for her surgery.
As it turned out, this patient had no other medical treatment or previous consultations concerning her macromastia. She also had no history of being referred for physical therapy, chiropractic treatment, an orthopedic consultation or a dermatology exam. For many procedures, this lack of treatment history might not be an issue. But for breast reduction, which can be considered cosmetic or reconstructive, depending on the patient – and the insurance company reviewer – the lack of history for this patient would prove problematic.
Unfortunately, the patient had not completed all of the regimens that her insurance required for the reduction procedure to be covered in her case. She will be able to reapply for reduction mammoplasty coverage after the requirements have been completed, but, unfortunately, there is still no guarantee that her insurance will cover the procedure. Naturally, as a college student, she was not in the position to consider paying out-of-pocket for the procedure and was not happy to discover the insurance hurdles she would need to go through for potential coverage.
This story is just an example of why it’s so important for patients to do their homework regarding their insurance coverage for any surgical procedure before seeing a surgeon. The answer to “is breast reduction surgery covered by health insurance?” can be very complicated and involve many variables.
Breast reduction and health insurance
It is universally believed by patients that if a surgery is considered reconstructive, it is medically indicated and covered by health insurance. Conversely, many patients believe if a procedure is considered cosmetic, it is not a medically indicated and covered procedure.
In the case of breast reduction, however, for insurance purposes, it will typically be considered a cosmetic procedure until the patient can prove an adequate number of health issues and attempted remediations of those issues prior to undergoing corrective surgery. Once the threshold has been reached, the insurance company may then consider breast reduction a reconstructive procedure for that patient and cover it. The problem is that the threshold can be different for every insurance company or insurance company reviewer. It is my opinion that breast reduction surgery has long been thought of as a “hybrid” procedure. It is considered reconstructive in attempts to obtain insurance coverage for the surgery, but it is also considered cosmetic in that patients expect meticulous aesthetic expertise in their surgery and results.
In our practice, it has become increasingly difficult to obtain insurance coverage for breast reduction surgery. Insurance companies frequently require 2-3 documented reports from other referred specialists before they’ll consider covering it. Also, the insurance companies commonly request 6-12 months of documentation and treatment by either a physical therapist, chiropractor, dermatologist or orthopedist.
What does this mean for a patient who needs the procedure due to chronic health problems caused by macromastia? Keep yourself updated on policies during this process, as the insurance company’s criteria are this year might not be the same next year.
If you feel that you are a candidate for breast reduction surgery and are requesting coverage under your health insurance, it is important that you contact your health insurance carrier and have them forward to you in writing their criteria for coverage. Every insurance company has different, independent criteria and indications. While your neighbor down the street may qualify for the procedure via one insurance carrier with a seemingly less severe situation, you may not be given the same answer by yours. On average, it takes between 3-6 months of preparation, including secondary consultations with other healthcare providers and possible therapy (physical therapy or chiropractics) to qualify for insurance coverage for breast reduction.
How do you handle this? Notify your primary care physician as soon as possible concerning any symptoms which may be related to your macromastia. It is never too early to start the process. Please contact your plastic surgeon’s office with any questions you might have that relate to breast reduction surgery and coverage through your health insurance and they can try to help guide you through the process, so that you can obtain the care you need.
Does Insurance Cover Breast Reduction For Back Pain
If you are a woman with large breasts and struggle with neck, shoulder or back pain, reduction surgery is an option. Unfortunately, this procedure is largely considered elective in nature, which means insurance companies will likely refuse to cover treatment.
Insurance companies have a variety of criteria that they use to determine if a breast reduction will be covered by your plan. It is also important to remember that these criteria may change from year to year. Although an insurance company may be known to cover a certain procedure, they may have negotiated specific contracts with specific exemptions with your employer that could have excluded a breast reduction.
Your insurance company may wish to learn about some or all of the following criteria to determine if your procedure will be covered:
1. Signs and symptoms for which a breast reduction may be medically indicated. Insurance companies assign specific numeric codes to medical problems or symptoms called ICD-9 (International Classification of Diseases) codes. Large breasts (ICD-9: 611.1) can cause postural backaches (ICD-9: 724-5, 781.9), and upper back and neck pain (ICD-9: 724.1, 723.1). Skin irritation referred to as intertrigo (ICD-9: 695.89) as well as pressure leading to ulnar nerve parasthesias or numbness (ICD-9: 782.0) may also be related to excessively large breasts.
2. Body mass index (BMI). This is a number that is used to determine your weight status. It correlates your height and weight and should be used as a general guideline only. See the bottom of this document for information on the BMI and how to calculate it.
Some insurance companies will deny breast reduction surgery unless the BMI is <30, others <35, while others need to see documentation that the patient has attempted to lose weight in the past through diet, exercise or weight loss surgery. This is because breast size may decrease with weight loss.
3. Weight of breast tissue removed. Most insurance companies will want to know the weight of breast tissue the plastic surgeon believes he or she can remove during a breast reduction. This number may be 450 grams, 500 grams or 600 grams. Some companies have a more detailed approach to avoid penalizing patients who are of smaller stature but who have proportionately smaller breasts. These companies will correlate the body surface area (BSA) with the weight of the specimen removed. So, in these cases, for small individuals the amount of volume that needs to be removed for coverage may only be 325 grams, whereas for larger individuals this weight may need to approach 1,000 grams.
4. Breast reduction to match a breast treated for breast cancer. A breast reduction is also covered if it is to balance a healthy but larger breast with the other breast that has been affected by breast cancer and its treatment. This is protected by the Women’s Health and Cancer Rights Act of 1998. This ensures reconstructive treatment of the affected breast as well as balancing procedures to match the healthy breast to the reconstructed breast. This may include a breast reduction of any size.
5. Supportive letter from another physician or health care provider. Although a plastic surgeon should perform your breast reduction, he or she is likely to have just met you for the first time during consultation. Your insurance company may request supportive letters from other health care providers to support the request that a breast reduction will treat your medical symptoms. This supportive letter may also serve to document that attempts at weight loss, exercise and physical therapy have already been made to treat the symptoms of excessively large breasts. It may also be necessary to document cases of rashes or intertrigo.
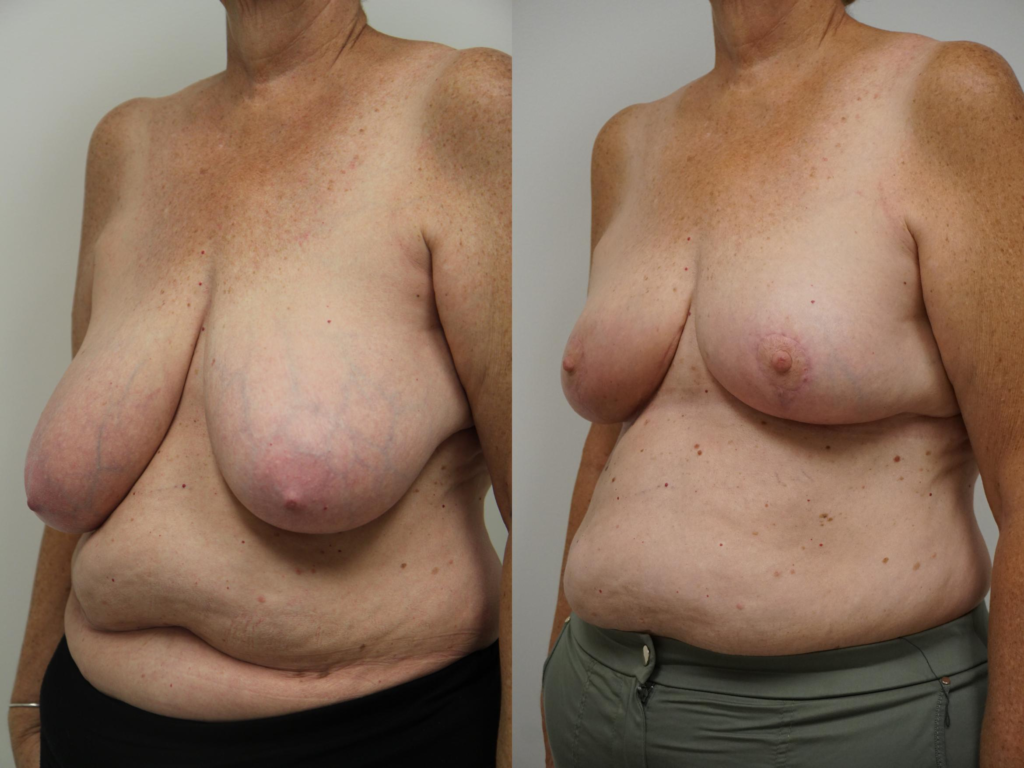
6. Photograpy and measurements. Your plastic surgeon may submit de-identified photos of you as well as specific measurements to quantify the size of your breasts relative to your frame to provide further evidence that a breast reduction may be medically indicated.
More information on the Body Mass Index (BMI):
The BMI can be calculated as :
BMI = ([weight in pounds] x 703)/(height in inches)2
BMI = (weight in kilograms)/(height in inches)2
In general, a BMI 30 is obese. This is not a perfect measure since it does not take into account things like percent body fat. Some professional athletes with very little body fat but a lot of muscle mass are categorized as obese on this scale.
Breast reduction surgery usually requires the nipple and areola to be raised and for extra skin in the lower breast to be removed. So breast reduction surgery requires that an incision be made around the nipple and areola to reposition them as well as under the breast to remove redundant skin. A vertical breast reduction limits scars to around the areola and a single vertical scar below it. A Wise-pattern breast reduction, used for particularly large breasts with large amounts of extra skin, also includes an incision on the undersurface of the breast and is sometimes referred to as an “anchor” scar.
How does pregnancy affect a breast reduction?
Breast reductions can be performed in women before having had any children
If you are an appropriate candidate, a breast reduction can be performed before you become, or are actively planning to become, pregnant – particularly if the breasts cause functional problems like back and shoulder pain, or hygiene issues. If you are interested in breast-reduction surgery after pregnancy, then you will need to delay surgery for several months after you are finished lactating. This is to reduce the risk of infections and cysts after breast-reduction surgery. If you are between pregnancies, and are planning to have more children in the not-too-distant future, then you may choose to hold off on breast-reduction surgery until you are finished having children. This is because subsequent pregnancies are progressively more likely to add size and change the shape of your breast even after breast reduction surgery. By waiting, a more long-lasting result can be achieved, and may save you from wanting “touch-up” surgeries that ultimately add recovery time.
This article focuses solely on how to put contact lenses in small eyes. There are a few suggestions you should consider every time you try to put the lenses on. First of all, wash your hands before we continue and dry them. Now we can start.
The first part of this article focuses on soft contact lenses and the different techniques you should consider. In the second part, I will give you my tips for rigid contacts.
Before you begin with the lens right away I advise you to first place your fingers without the lens. I assume you are right-handed. If you are left-handed you can just inverse my recommendations. Prepare a towel and a mirror before you begin. A white towel comes in handy to locate the lens faster when you drop it. In addition to that, a lot of my clients find it easier to try the contacts in front of a mirror.
Place Your Fingertips Correctly
This part is critical! Make sure to place your fingertip right on the spot where your eyelashes sit. First, do this with your lower lid with the middle finger of your right hand. Then take the left hand and place the middle finger of your left hand right where the lashes are on the upper lid. Just watch the pictures below.
This will clear things up for you. When you grab your upper eyelid make sure to not go come from the side with your hand as this approach will give you less space to handle the contact lens in front of your eye. grab your upper lid and place your left hand in front of your forehead.
Ok perfect now you know the perfect spot where you should place your fingers. with this placement of your fingers, you will not be able to blink anymore. If you place your fingers a little above and below your eyelashes you will be still able to blink which makes it a lot harder to put the contacts on your eyes.
Just for practicing purposes pull on your lids so you can see the white parts of your eyeball above and below the iris. This pulling force needs to be kept up during the whole setup until the lenses sit on your eyes. So constantly remind yourself “Pull the lids out of the way, pull…pull and again pull”. This is also what I say to my clients constantly when they are in my shop and get the contact lenses fitted for the first time.
Place the Contact Lens Right on Your Fingertip of Your Index Finger
I advise you to place the contact lens on your right index finger right on your fingertip. This way you will have an easier time placing the contact lens on your eye. When you place the contact lens on your fingertip make sure the edges of the contact lens are free. If the contact lens sits on your finger in an askew way the lens will not land even on your eye and therefore will not be able to snuggle on your eyeball.
Now pull on your lids and try to place the contact lens right on your cornea. You can even place the lens on the white of your eyeball and it will automatically make its way in the middle of your eyes after you blinked a few times. This sounded easy but in reality, you will experience this:
- The contact lens falls down
- The contact lens does not snuggle on your eye but rather sticks to your finger
- The contact lens sits upended on your eye because your lids pushed it this way
- The contact lens sits on your eyelashes
So in reality you will oftentimes need up to an hour before the contact lens sits on your eye. Especially when you have small eyes the process is a little harder and will take more time. Make sure to get your eyes a little rest after you tried it a few times.
The mentioned bullet points are usually caused because your eyelashes hindered you to place the contact lens on your eyes correctly and they had a few seconds to snuggle on your eye. Make sure you pull on the lids permanently when trying to place the contacts on your eye. This is key. Pull, pull and pull and give the lens at least three seconds when you feel the lens on your eyeball.
This process should be repeated until the lenses sit on your eye. There are also a few ninja optician tips you can try for extra small eyes I will mention below but first, the already mentioned basics need to be set before you try my ninja optician tips below.
If you place your fingers in the positions mentioned before and you still can’t open your eyes wide enough for a contact lens it is time to sneak the contact lens under your lids. You normally place the contact lens on the fingertip and the soft contact lens has a diameter of approximately 0,55/inches 14mm when it is unfolded on your eye. But when you push the contact lens a little with your thumb you can reduce the size a little so you can slide the lens under your lid.
Ninja Optician Tipps for Extra Small Eyes
One word of caution though. Try not to force the contact lens in your eyes. When I say slide them under your lid I really mean do it in a gentle way and give the contact lens enough time to snuggle on your eye. When you push the lens a little to make the vertical diameter smaller the probability is a little higher for the contact lens to not unfold on your eye.

When this happens you will experience discomfort and need to pull the lens out.
When problems with contact lenses and extra small eyes come up it also helps to record yourself from the side with your smartphone. This way you can see where you are looking when trying to get the contact lens on your eye. This is important because when move your eyeballs constantly before the contact lens has enough contact with its surface the lens can not settle correctly.
The Diameter of the Contact Lens
Above I mentioned the average diameter of a soft contact lens. However, if you can not put the contact lens on your eyes even after a few sessions I would recommend smaller contact lenses. In some cases, individual soft contacts can work but in most cases, rigid gas permeable contact lenses will be even smaller as those usually only cover a part of your cornea.
So with a smaller lens, you should have an easier time putting the lens on even with smaller eyes. The placement of rigid contact lenses is even more important in the first place because they need to be placed right on your cornea when you put them in. In some cases, it is easier to look a little up or down so your lids are as far away as possible from the lens so you can place them as easily as possible on your eyes. Just look at the pictures below and things will get a lot clearer for you.
I hope the instructions here led to success the next thing will be to put them out. Especially with smaller eyes, this can be an issue too. So if you are struggling to remove the contact lenses I have the next article ready for you here.
I wish you a great day.
Breast Reduction Requirements Weight
Some insurance companies will deny breast reduction surgery unless the BMI is <30, others <35, while others need to see documentation that the patient has attempted to lose weight in the past through diet, exercise or weight loss surgery. This is because breast size may decrease with weight loss.
Paying out-of-pocket for breast reduction surgery is not viable for many women, leaving them to suffer from chronic back pain. At Caliber Pain, we feel that this policy is unfair to patients who have genuine health problems related to breast size and body shape. These issues are very real and do justify effective treatment through reduction.
JUSTIFIABLE BREAST REDUCTION
The good news is that your health insurance provider may cover breast reduction surgery when there is a medical justification. A pain management specialist can help you support your coverage claim with a large amount of medical evidence.
We know how and why the size and shape of breasts puts strain on the spine. Many of our patients suffer from degenerative conditions such as osteoarthritis, which can be directly linked to breast proportion. Not all women with large breasts will go on to experience chronic pain. However, there is a correlation that points to most sufferers having a smaller frame.
Medical justification plays a role in how all health insurance claims are decided. A breast reduction is technically a plastic surgery procedure, but the reason for choosing the surgery is important. A woman who is suffering from chronic back pain is not concerned about aesthetics. Treatment is strictly related to finding relief from debilitating medical conditions.
Wearing contacts gives you great freedom over glasses, but for many, the struggle and frustration of learning how to insert and remove contact lenses is too much. Here’s your expert guide to worry-free contact wear, complete with troubleshooting for common contact-wearing problems.
1. How to remove a contact lens that “disappeared”
If a contact disappears, it may have fallen onto the floor to be lost forever, but, in some cases, it could still be stuck under your eye. You may feel a prick under your eyelid after a contact has disappeared because the contact has likely folded or otherwise moved out of place on the eyeball.
If you can’t see it, don’t try to lift your lid up enough to grab it because you’ll hurt yourself. Instead, close your eye and look down as far as you can, and then, while still looking down, gently pull the lid up slowly. This dislodges the lens so that you can easily remove it. If this doesn’t work, please contact Dr. Stein for an appointment and he will assist you.
2. How to remove a contact lens first thing in the morning
It’s not advisable to sleep in your contacts, but some contacts are designed for 24-hour wear, making sleeping in them less risky. When you first wake up, your eye may be dry, and the contact may have temporarily adhered to the cornea. Trying to remove it in this state may damage your cornea, so make sure your eye is sufficiently lubricated with eyedrops before removing the contact.
3. What to do if the contact keeps falling out during insertion
The trick is to gently hold the contact on the eye for about 1 second and then very slowly move the eyeball back and forth slightly. This helps the fluids on your cornea pick up the contact from your finger.
Without blinking, move the eyeball slowly down and then around to secure the lens in the eye. Now you can blink, and the lens should stay in place. With practice, this takes fewer than 2 seconds to do.
4. What to do if your contact falls out at an inconvenient time
As a contact wearer, you should always be prepared. Carry a travel-size bottle of saline in your backpack, satchel or purse. Keep a contact case with you at all times. If the contact falls out, don’t attempt to re-insert it immediately. Instead, put some fresh saline into your case, place the contact in there, and then get to the nearest restroom to thoroughly wash your hands and the contact before reinserting.
Never rinse contacts with tap water even in an emergency! Well water and even some city water may have microbes and parasites you do not want in your eyes.
5. How to properly insert a contact lens (step-by-step)
To insert:
- Wash and dry your hands on a clean towel.
- Remove the contact from its case with your thumb and index finger and place it on the index finger.
- If the contact is not a bowl shape, turn it the other way.
- Use your other hand to slowly lift your eyelid.
- Look up and slowly place the lens on the eye, giving it 1 second to suction to your eye fluids.
- Once you feel it attached, blink slowly to strengthen its bond in the right position.
- Dump any solution left in your case into the sink and allow the case to dry completely. A CDC study found that as many as 55 percent of contact wearers don’t use new solution every time, which is scary given the number of dangerous eye infections you can contract with poor contact hygiene.
To remove:
- Wash your hands.
- Prepare your case with new solution.
- Pull your eyelid up with one hand.
- Look up.
- Gently slide the contact onto the white of your eye.
- Grab the contact with a thumb and index finger.
- Place the contact carefully in the case and close the case.
6. How to stop dropping the contact during insertion or removal
Be patient with yourself. The main reason people struggle is they see how quickly others can insert and remove contacts, but the people who do it quickly have been wearing contacts for at least a couple of weeks. Give yourself a little extra time in the morning to get the hang of it, and soon, you’ll be as fast and flawless as they are.